
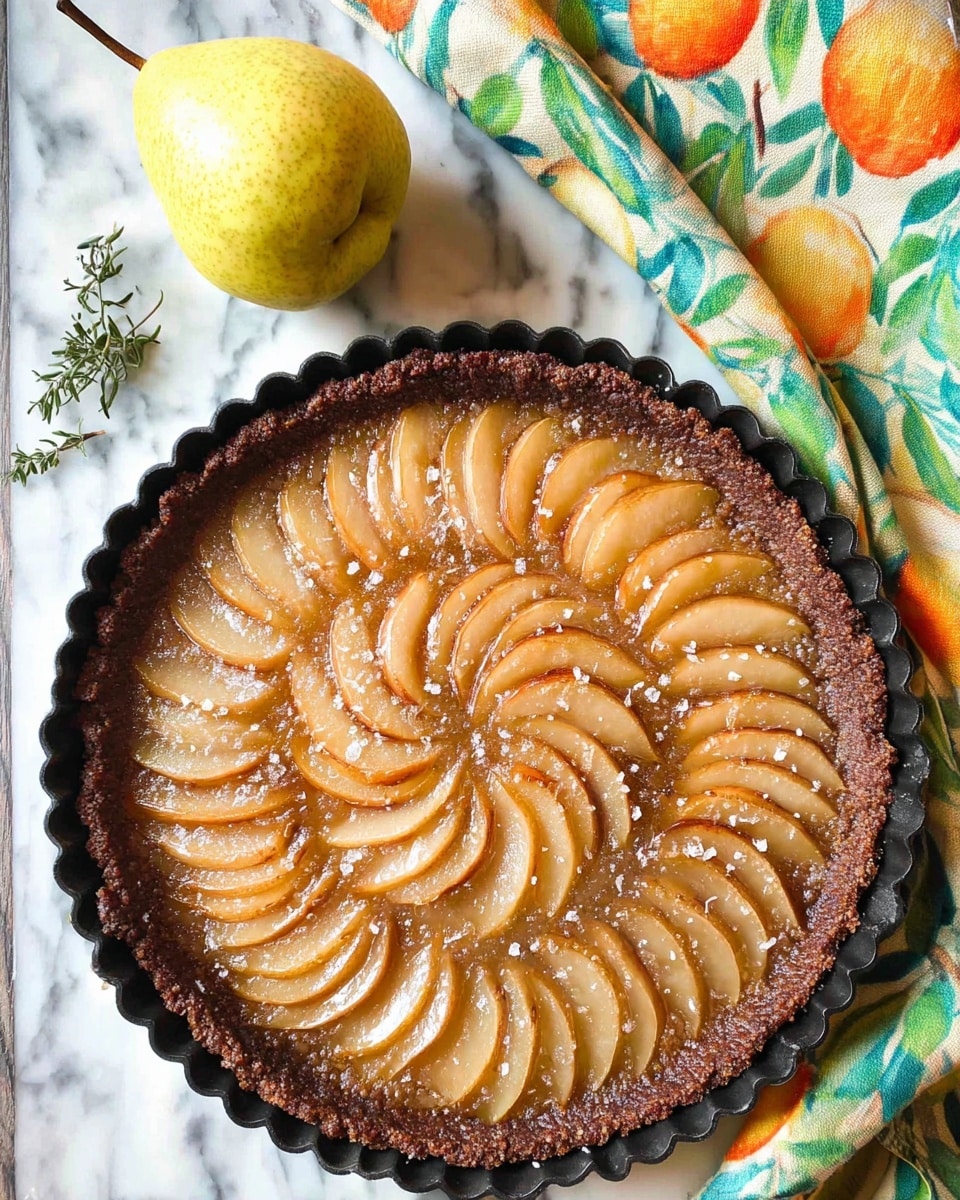
If you’re craving a dessert that feels fancy but doesn’t demand hours in the kitchen, you’re going to love this 10 Minute (Beautiful) French Pear Tart Recipe. I absolutely love how this tart comes together with a buttery, flaky crust and delicate pear slices arranged like little works of art. The best part? You can whip up the dough and topping in just ten minutes flat, which means less fuss and more snacking (my family always goes crazy for this one). Trust me, once you try it, you’ll find that this recipe is your new go-to for celebrations or a sweet everyday treat!
Why You’ll Love This Recipe
- Speedy Prep: The dough and topping come together in just 10 minutes, perfect for last-minute desserts.
- Elegant Presentation: The concentric circles of pear slices make this tart look like you spent hours crafting it.
- Versatile & Adaptable: You can swap pears for peaches or adjust ingredients for vegan needs without missing a beat.
- Minimal Ingredients: Uses simple pantry staples you probably already have, making it super accessible.

Ingredients You’ll Need
Working with just a handful of ingredients, this 10 Minute (Beautiful) French Pear Tart Recipe relies on fresh, ripe pears and a tender, melt-in-your-mouth crust. I like to use a mix of whole wheat and all-purpose flour for a rustic texture, but you can easily keep it simple and all white flour if you prefer.
- Flour: I use half whole wheat and half all-purpose for extra nuttiness and texture.
- Salt: Just a pinch to balance the sweetness and bring out all the flavors.
- Sugar (for crust): Adds a touch of sweetness without overpowering the pear’s natural flavor.
- Vegetable or canola oil: Keeps the crust tender and easy to press into the pan.
- Mild olive oil: Adds subtle fruitiness to the dough; make sure it’s mild so it doesn’t dominate the flavor.
- Milk or water: Helps bind the dough gently, I use milk for a richer taste but water works fine too.
- Vanilla extract: A splash enhances the overall aroma and depth.
- Additional Flour (for topping): Combines with sugar and butter to create the crumb topping.
- Sugar (for topping): Sweetens the crumb topping to complement the tart pears.
- Margarine or butter (cold): Cold chunks create that perfect crumbly texture when mixed with dry ingredients.
- Pears (or peaches): Large, ripe, and sliced about 1/3 inch thick—this is the star that makes your tart beautiful and juicy.
Variations
I’ve played around with this 10 Minute (Beautiful) French Pear Tart Recipe quite a bit, and I love how it adapts effortlessly to different tastes and dietary needs. Feel free to customize it—this recipe is a forgiving canvas for your creativity!
- Vegan Variation: Use vegan margarine and a plant-based milk like oat or almond; the tart still turns out silky and rich.
- Fruit Swap: Peaches or nectarines make a delicious summer twist—just peel and slice similarly to the pears I recommend.
- Gluten-Free Option: Try swapping with a gluten-free flour blend suited for baking, but expect a slightly different texture.
- Spiced Topping: Add a pinch of cinnamon or nutmeg to the crumb topping for some warm spice notes.
How to Make 10 Minute (Beautiful) French Pear Tart Recipe
Step 1: Prepare Your Oven and Gather Ingredients
First things first: preheat your oven to 425°F. I like to place a piece of foil or a baking sheet on the lower rack—this smart trick catches any drips from the juicy pears so your oven stays clean. Now, have everything measured and ready; once you start mixing, this recipe goes fast!
Step 2: Whip Up the Tart Crust
In a mixing bowl, stir together 1 1/2 cups flour (I use half whole wheat), salt, and sugar. In a separate bowl, whisk the oils, milk, and vanilla until combined. Pour the wet mixture into the dry and gently mix with a fork—don’t overwork it! Then, use your fingers to press the dough evenly into an 11-inch tart pan, covering the bottom and about halfway up the sides. I discovered that going all the way up causes too much browning, so halfway works best for a tender crust.
Step 3: Make the Scrumptious Crumb Topping
Combine the extra flour, sugar, and cold margarine (or butter) in a small bowl. Using your fingers or a fork, mix until you get little clumps and crumbs, like loose sand. This topping melts into a gorgeous glaze as it bakes, adding sweet crunch to each bite.
Step 4: Arrange Pears and Add the Topping
Starting from the outside edge, arrange your pear slices in concentric circles atop the crust. Don’t be shy to overlap them slightly—it creates a beautiful layered effect. Then, sprinkle the crumb topping evenly over the pears. This part always makes me smile; it looks almost too pretty to bake!
Step 5: Bake Until Golden and Bubbling
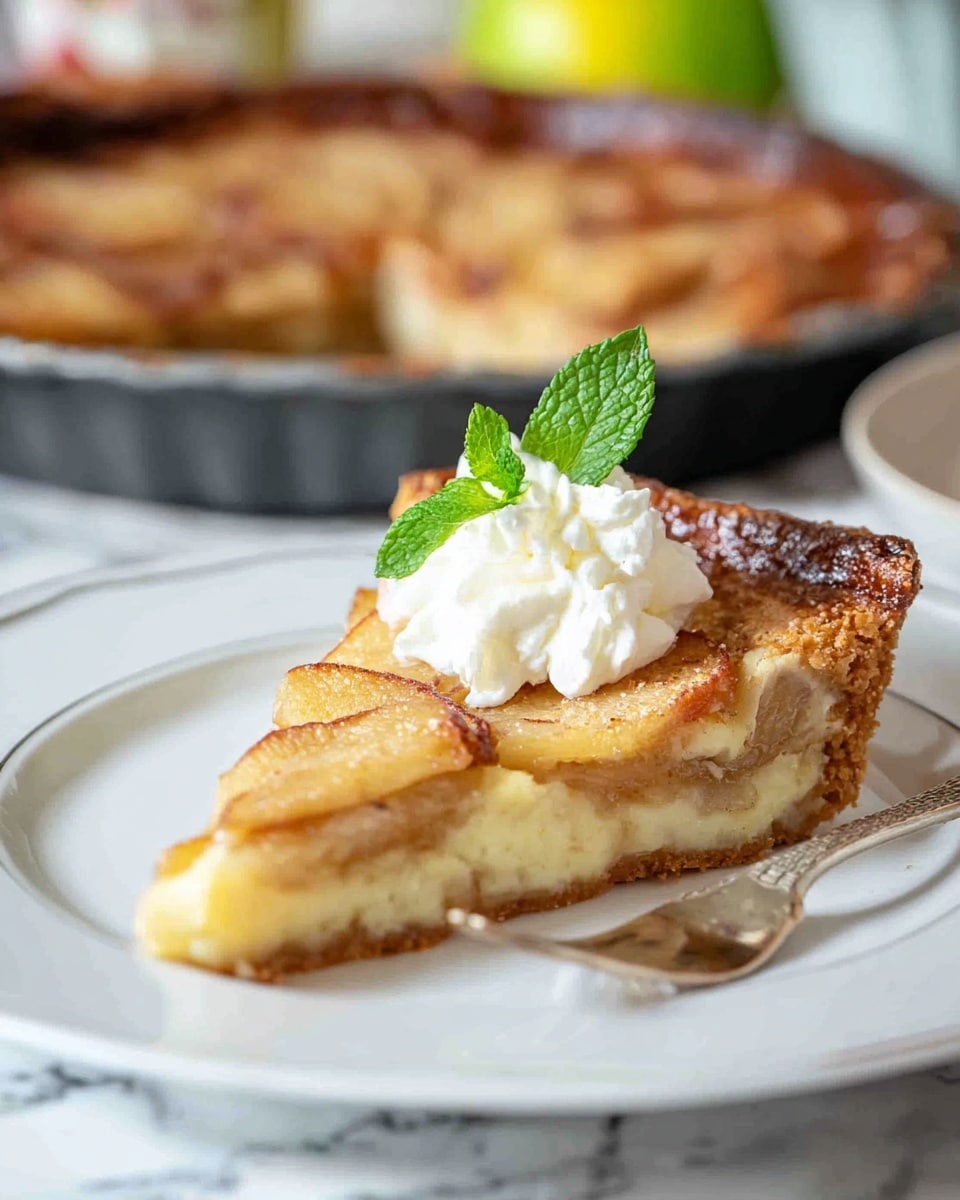
Pop the tart onto the middle rack, with your foil or baking sheet underneath on the lower rack. Bake for 35 to 45 minutes, until the filling is shiny with bubbling juice and the crust edges turn a lovely golden brown. Let it cool on a rack—you can serve it warm or at room temperature. Both are delightful!
Pro Tips for Making 10 Minute (Beautiful) French Pear Tart Recipe
- Choose Ripe, Firm Pears: I learned that using pears that are too soft causes sogginess; look for slightly tender but still firm fruit.
- Don’t Overmix the Dough: Mixing gently keeps the crust crumbly and tender, so stir just until combined.
- Press Dough Evenly: I use my fingertips to create an even, slightly thicker edge which holds the juicy pears beautifully.
- Foil on Lower Rack: This saved me from scrubbing burnt drips—trust me, it’s a kitchen game-changer.
How to Serve 10 Minute (Beautiful) French Pear Tart Recipe
Garnishes
I usually keep garnishes simple— a light dusting of powdered sugar adds a touch of elegance without overwhelming the delicate pear flavor. Sometimes, I drizzle a little honey or a vanilla glaze to add shine and sweetness that makes it feel festive.
Side Dishes
This tart pairs wonderfully with a scoop of vanilla ice cream or a dollop of lightly whipped cream. For a grown-up twist, I sometimes serve it alongside a cup of strong coffee or a glass of crisp white wine.
Creative Ways to Present
For special occasions, I like to place edible flowers around the tart or add a few fresh mint leaves for a pop of color. You can also serve individual slices on pretty plates with a drizzle of caramel sauce for an unforgettable presentation that feels truly indulgent.
Make Ahead and Storage
Storing Leftovers
I store leftover tart in an airtight container at room temperature for up to 2 days. The crust stays surprisingly crisp, and the pears remain juicy without sogginess creeping in too fast—just keep it away from humid spots.
Freezing
If you want to freeze this tart, wrap it tightly in plastic wrap and then foil. Freeze for up to one month. When you’re ready to enjoy, thaw overnight in the fridge and warm slightly before serving to bring back that fresh-baked taste.
Reheating
I reheat slices in a 300°F oven for about 10 minutes. This gently warms the tart and revives the crispness of the crust without drying out the juicy fruit. If you’re in a hurry, a quick zap in the microwave works too, but the crust won’t stay as crisp.
FAQs
-
Can I make the crust ahead of time for the 10 Minute (Beautiful) French Pear Tart Recipe?
Absolutely! You can prepare the crust dough a day ahead, wrap it tightly in plastic wrap, and refrigerate. When you’re ready to bake, press it into the tart pan as usual and proceed with the rest of the recipe. This makes your baking day even quicker and less stressful.
-
What if I don’t have pears? Can I use other fruits?
Yes! This recipe is quite flexible. Peaches, nectarines, or even apples work well. Just slice them about 1/3 inch thick and arrange them similarly. Keep in mind fruits with higher water content might release more juice, so watch your baking time accordingly.
-
Is this recipe suitable for vegans?
It sure is. By using vegan margarine and a plant-based milk alternative, you keep the entire tart vegan while still achieving that lovely crumbly topping and flavorful crust. The final result is just as delicious as the original!
-
How do I prevent the crust from getting soggy under the fruit?
I learned that pressing the dough only halfway up the tart pan sides, rather than all the way to the top, helps with even cooking and less sogginess. Also, preheating the oven and baking at a relatively high temperature (425°F) helps set the crust quickly so it stays crisp.
Final Thoughts
I honestly can’t recommend this 10 Minute (Beautiful) French Pear Tart Recipe enough. It’s one of those recipes that looks like you spent hours fussing, but it’s actually fast, straightforward, and downright fun to make. Every time I bring it to family dinners or casual get-togethers, I hear the same reactions—“Wow, did you make this from scratch?” Yes, I did, and you can too! So go ahead, grab some ripe pears, and enjoy baking your way to a effortlessly beautiful, tasty French tart that’s bound to impress.
Print
10 Minute (Beautiful) French Pear Tart Recipe
- Prep Time: 15 minutes
- Cook Time: 45 minutes
- Total Time: 60 minutes
- Yield: 8 servings
- Category: Dessert
- Method: Baking
- Cuisine: French
- Diet: Vegan
Description
This delightful French Pear Tart features a tender, press-in crust with a luscious arrangement of ripe pears topped with a crumbly, sweet glaze. Ready in under an hour, it combines simple ingredients to create an elegant dessert that’s perfect served warm or at room temperature. The recipe offers a vegan-friendly option by using margarine and plant-based milk, making it an effortless yet beautiful treat for any occasion.
Ingredients
For the Crust
- 1 1/2 cups flour (half whole wheat recommended)
- 1/2 teaspoon salt
- 1 teaspoon sugar
- 1/4 cup vegetable or canola oil
- 1/4 cup mild olive oil
- 2 tablespoons milk or water
- 1/2 teaspoon vanilla extract
For the Topping
- 2 tablespoons flour
- 3/4 cups sugar
- 2 tablespoons margarine (or cold butter)
- 3-4 large ripe pears, cored and sliced about 1/3-inch thick (or peaches, stone removed and sliced)
Instructions
- Preheat the Oven: Set your oven to 425°F (220°C). Place a piece of foil or a baking sheet on the lower rack to catch any dripping juice during baking, protecting your oven from spills.
- Make the Crust: In a mixing bowl, combine 1 1/2 cups flour, 1/2 teaspoon salt, and 1 teaspoon sugar. In a separate bowl, whisk together the vegetable/canola oil, mild olive oil, milk (or water), and vanilla extract. Pour the wet mixture into the dry ingredients and gently mix with a fork until just combined. Press the dough evenly into an 11-inch tart pan, covering the bottom and about halfway up the sides, avoiding the very top edge to prevent excessive browning.
- Prepare the Crumb Topping: In a small bowl, mix 2 tablespoons flour, 3/4 cup sugar, and 2 tablespoons cold margarine or butter until the mixture becomes crumbly using your fingers or a pastry cutter.
- Assemble the Tart: Starting from the outside edge, arrange the pear slices in concentric circles over the crust, covering the entire base. Evenly sprinkle the crumb topping over the layered pears.
- Bake: Place the tart in the preheated oven and bake for 35 to 45 minutes, or until the fruit juice appears shiny and bubbly and the crust starts to brown nicely.
- Cool and Serve: Remove the tart from the oven and let it cool on a rack. Serve warm or at room temperature for the best flavor and texture.
Notes
- This tart features a simple topping that melts into a beautiful glaze, enhancing both flavor and appearance.
- The press-in crust is quick and easy, eliminating the need for rolling out dough.
- Using margarine and plant-based milk offers a vegan-friendly option.
- To prevent the crust edges from burning, do not press the dough all the way up the tart pan sides.
- You can substitute pears with peaches or other firm stone fruits for variation.
- Protect your oven with a foil-lined tray on a lower rack to avoid sticky drips from the fruit juices.
Nutrition
- Serving Size: 1 slice (1/8 of tart)
- Calories: 352 kcal
- Sugar: 26 g
- Sodium: 180 mg
- Fat: 17 g
- Saturated Fat: 2 g
- Unsaturated Fat: 15 g
- Trans Fat: 0.03 g
- Carbohydrates: 49 g
- Fiber: 3 g
- Protein: 3 g
- Cholesterol: 0 mg

