
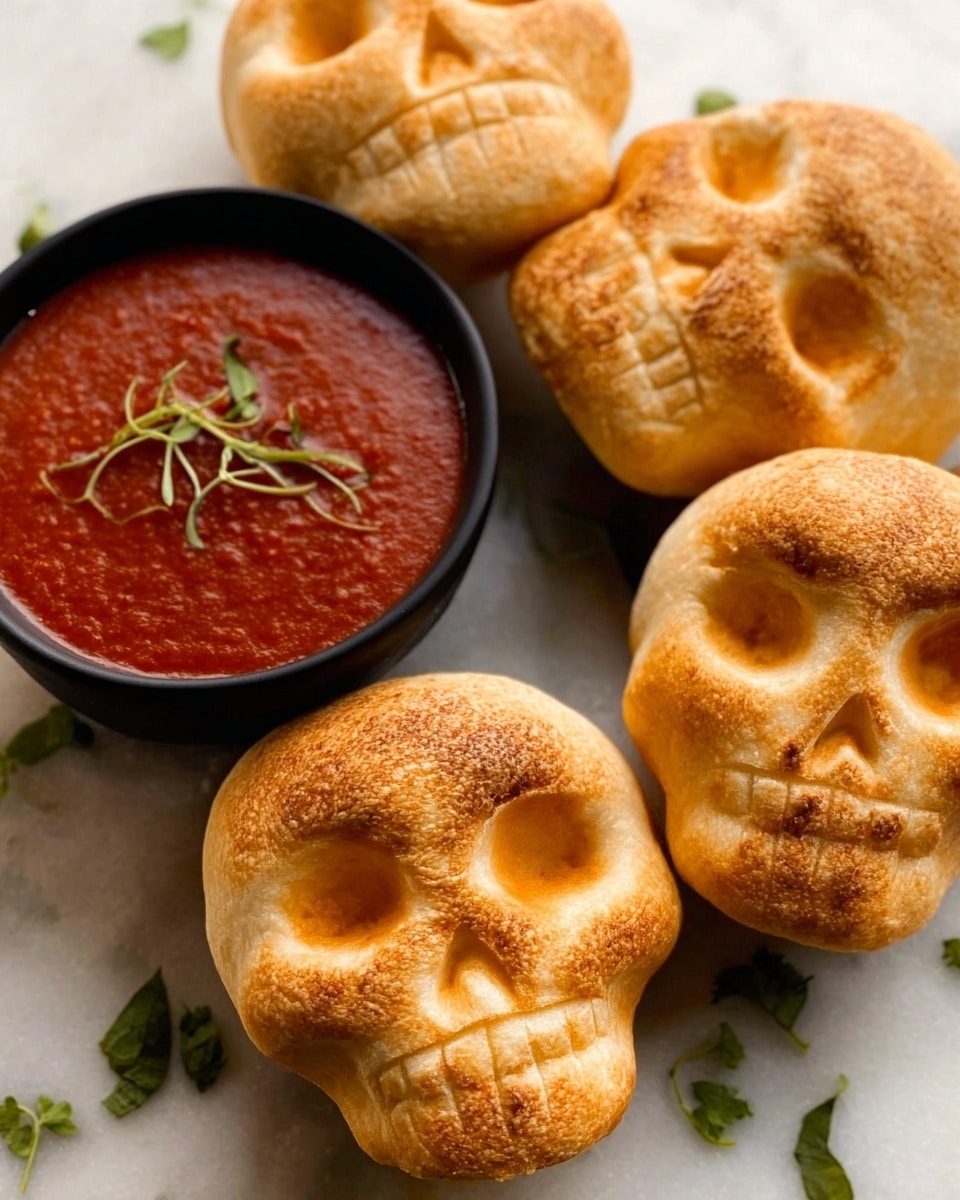
If you’re looking for a spooky twist on pizza night, you’re going to absolutely love my Cheesy Halloween Pizza Skulls Recipe. These fun, cheesy, and totally customizable pizza pockets shaped like skulls make for a perfect festive meal or party snack. I remember the first time I made them, and my family basically begged me to make seconds — and who can blame them? They’re gooey, delicious, and just the right amount of creepy to bring some Halloween spirit to your table. Stick with me and I’ll show you all the tips and tricks to nail this recipe perfectly!
Why You’ll Love This Recipe
- Perfect for Halloween: The spooky skull shape turns dinner into a fun, festive experience everyone enjoys.
- Super Customizable: You can fill these cheesy pockets with your favorite toppings, making it easy to please picky eaters.
- Simple to Make: Using pre-made pizza dough helps you get dinner on the table fast without sacrificing flavor.
- Kid-Approved: My family goes nuts over these, and they’re a fantastic way to sneak in some veggies like spinach or corn.

Ingredients You’ll Need
Gathering the right ingredients is key to making these cheesy pizza skulls truly shine. I like to keep good quality pre-made pizza dough on hand, and fresh toppings make all the difference—trust me, your taste buds will thank you!
- Pre-made pizza dough: Using store-bought dough saves so much time and gives a great chewy texture perfect for pockets.
- Pizza sauce: Opt for a flavorful sauce, but don’t overdo it or the dough might get soggy inside.
- Shredded mozzarella: The classic gooey cheese that melts beautifully inside each skull.
- Parmesan cheese: Adds a nice salty, nutty finish on top of the mozzarella.
- Cooked sausage: I usually crumble and brown it first for extra flavor and texture.
- Mini pepperoni: Perfect bite-sized pieces that stay put inside the pockets.
- Black olives: Sliced thinly to offer briny pops without overpowering the cheese.
- Sliced ham: Chop it up finely for a subtle smoky flavor.
- Crumbled crispy bacon: I like to add just a sprinkle for crunch and savoriness.
- Mini Italian meatballs: These little flavor bombs are an awesome way to switch up the protein.
- Cooked corn kernels: Adds a sweet crunch and color contrast inside the mix.
- Baby spinach: Sneaks in some greens and wilts nicely during baking.
- Fresh basil: For a pop of herbal brightness either inside or as a garnish.
- Marinara sauce: For dipping – because who doesn’t love extra sauce on the side?
- Chopped parsley or basil: A fresh sprinkle on top to brighten up the look and flavor before serving.
Variations
I love tweaking these cheesy Halloween pizza skulls depending on what I’ve got in the fridge or the vibe I want for the night. Don’t hesitate to make this recipe your own — your guests will appreciate your personal touch!
- Vegetarian option: I swapped out all the meats for extra veggies like mushrooms, bell peppers, and artichokes once, and it turned out just as amazing.
- Spicy version: Add some red pepper flakes inside or swap the regular pizza sauce for a spicy arrabbiata – if you like heat, it’s a game changer!
- Cheese varieties: Try mixing mozzarella with provolone or gouda for a deeper, richer cheese flavor experience.
- Gluten-free dough: If I’m making it for gluten-sensitive friends, a good quality gluten-free dough works well — just watch the baking time closely.
How to Make Cheesy Halloween Pizza Skulls Recipe
Step 1: Prep the Dough and Skull Tray
First things first, spray your mini skull baking tray generously with cooking spray so the dough won’t stick. Then dust your work surface lightly with flour—that little bit of extra flour makes rolling out the dough so much easier and prevents frustrating sticking. Next, roll, pat, or stretch your pizza dough out to about 1/4 inch thick. Don’t stress about perfect shapes—cut the dough into 6 rectangles roughly the size of the skull molds. Imperfect shapes just add to the homemade charm!
Step 2: Fill and Seal the Pizza Skulls
Take one dough piece at a time and gently press it into the skull cavity. Now the fun begins! Spoon in about a tablespoon of pizza sauce followed by a good handful of shredded mozzarella and a sprinkle of Parmesan. Then, pile on your favorite toppings — I love mixing sausage, mini pepperoni, and a bit of spinach to make it balanced and savory. Before sealing, add just a tiny bit more pizza sauce on top (less is more here—no soggy pockets!). Fold the dough over the filling carefully and pinch the edges tightly like sealing a mini calzone. This keeps all that cheesy, meaty goodness locked inside.
Step 3: Chill and Bake
Pop the filled skull tray into the refrigerator for about 10 minutes while you preheat your oven to 400°F. Chilling helps the dough hold its shape during baking. When ready, bake the tray for 16 to 20 minutes until the dough is lightly golden brown and cooked through. Keep an eye on it—different dough brands may vary a bit in baking time. Once out, let the pizza skulls cool for 5 minutes before unmolding to avoid any cheese oozing out.
Pro Tips for Making Cheesy Halloween Pizza Skulls Recipe
- Don’t Overfill: I learned the hard way that stuffing too much filling makes sealing tricky and can cause leaks—keep it moderate for neat pockets.
- Chill Before Baking: Refrigerating the filled dough helps maintain sharp skull edges and prevents spreading in the oven.
- Use a Toothpick for Details: I sometimes use a toothpick to gently press eyes or nose shapes, enhancing the skull look.
- Watch Your Oven’s Heat: Oven temps vary, so start checking at 16 minutes to avoid burning the edges—you want a nice golden glow.
How to Serve Cheesy Halloween Pizza Skulls Recipe
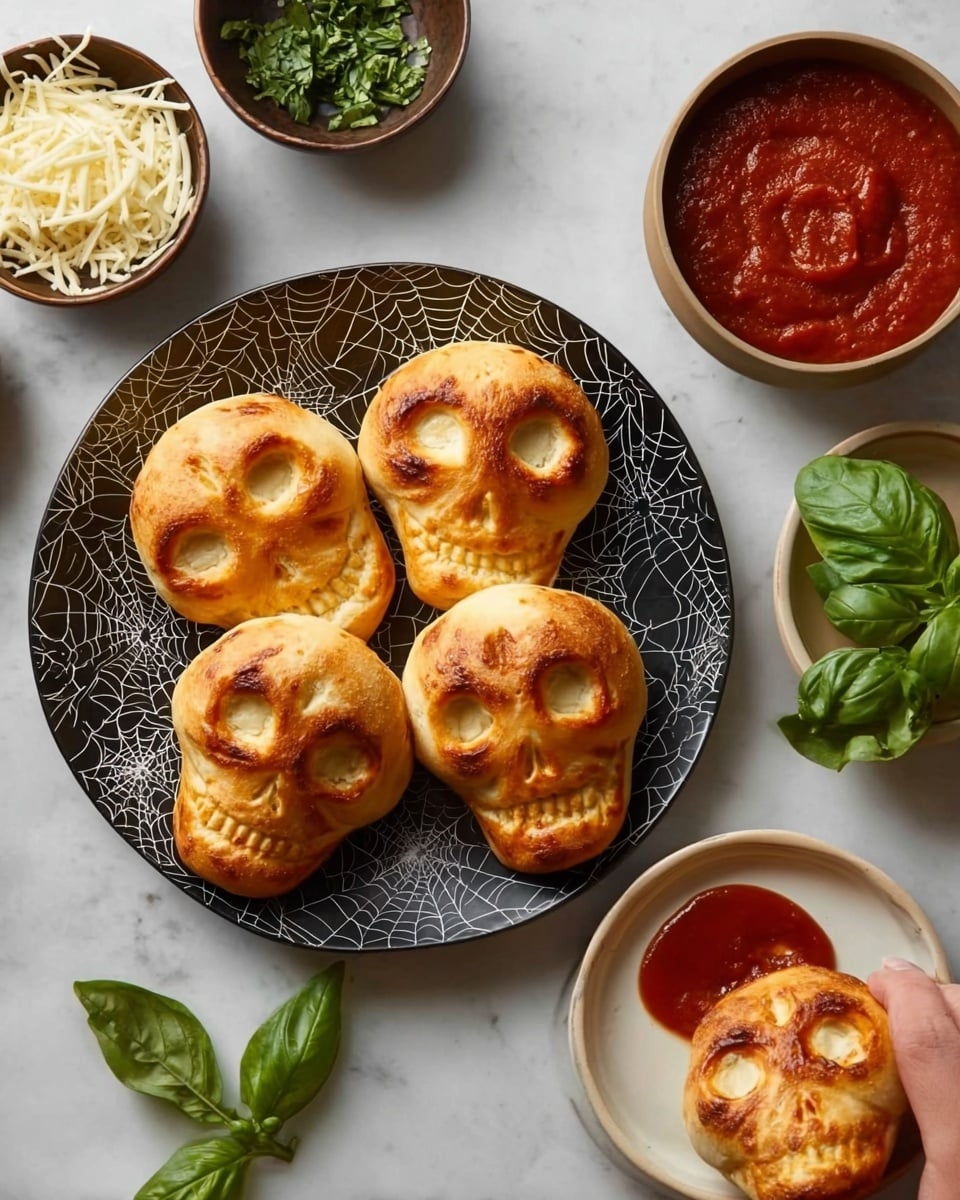
Garnishes
I’m a big fan of sprinkling chopped parsley or fresh basil right on top just as they come out of the oven—adds a pop of color and freshness that balances the cheesy richness perfectly. Plus a side of marinara sauce for dipping makes these pizza skulls all the more irresistible!
Side Dishes
I usually pair these with a crisp green salad or some roasted veggies to round out the meal. Another favorite of mine is serving them alongside sweet potato fries—that sweet and savory combo is an instant hit at my house.
Creative Ways to Present
One Halloween night, I arranged these pizza skulls on a dark serving platter lined with fresh basil and sprinkled with a little edible glitter for extra sparkle. Another time, I gently brushed the tops with garlic butter after baking for that irresistible sheen and aroma. Adding little olive “eyes” afterward made them look even creepier and delightful!
Make Ahead and Storage
Storing Leftovers
I recommend storing leftovers in an airtight container in the fridge for up to 3 days. I usually separate each pizza skull with parchment paper so they don’t stick together, which makes reheating easier and keeps them intact.
Freezing
Freezing works great for this recipe too. After baking and completely cooling, wrap each skull tightly in plastic wrap and then place them in a freezer-safe bag. I’ve found they keep well for up to 2 months. It’s so handy for last-minute Halloween snacks!
Reheating
To reheat, I like using the oven or a toaster oven at 350°F for about 10 minutes, which helps maintain that crispy exterior and melty cheese inside. Microwaving can get soggy, so I avoid it unless I’m in a rush.
FAQs
-
Can I make Cheesy Halloween Pizza Skulls ahead of time?
Absolutely! You can prepare and fill the pizza skulls, then refrigerate them before baking. This makes it super easy to pop them in the oven just before serving. You can also bake them ahead and reheat when needed.
-
What if I don’t have a skull-shaped baking tray?
No worries! You can still create these pizza pockets using a mini muffin tin or just shape small hand pies by hand. Just make sure to seal the edges well to keep the fillings inside.
-
Can I use fresh homemade pizza dough?
Yes! Fresh dough is fantastic and often adds a lovely texture, but remember it might need slightly longer baking time. Rolling the dough to about 1/4 inch thick is key so it cooks through without sogginess.
-
How do I keep the pizza skulls from leaking?
Using just the right amount of sauce and toppings and pinching the dough edges tightly helps prevent leaks. Chilling the filled pockets before baking also keeps them sealed and looking sharp.
-
What are the best toppings for Cheesy Halloween Pizza Skulls?
Use any favorites! Meats like sausage, pepperoni, ham, veggies like spinach or corn, and plenty of melty cheese all work wonderfully. Experiment and find your perfect combination.
Final Thoughts
Honestly, this Cheesy Halloween Pizza Skulls Recipe has become my go-to for October dinners and spooky parties alike. It’s one of those recipes that brings everyone together — kids and adults alike — and fills the house with that irresistible cheesy aroma. I love how easy it is to customize and how fun it is to make. If you want a festive, tasty, and crowd-pleasing recipe that’s just a little bit spooky, give these pizza skulls a try. You’ll be the Halloween hero of your kitchen, trust me!
Print
Cheesy Halloween Pizza Skulls Recipe
- Prep Time: 10 minutes
- Cook Time: 20 minutes
- Total Time: 30 minutes
- Yield: 6 pizza skulls
- Category: Snack, Appetizer, or Kids’ Dinner
- Method: Baking
- Cuisine: Italian-American
Description
Cheesy Halloween Pizza Skulls are fun, festive, and savory treats perfect for Halloween parties or a themed family dinner. Made with pre-made pizza dough, gooey mozzarella, parmesan, and a variety of delicious toppings like sausage, pepperoni, olives, ham, and bacon, these pizza skulls are individually stuffed, folded, and baked until golden. Served with marinara sauce and fresh herbs, they’re as tasty as they are spooky, and fully customizable to suit your favorite pizza flavors.
Ingredients
Dough and Sauces
- 13 to 16 ounces pre-made pizza dough
- 3/4 to 1 cup pizza sauce
- Marinara sauce for dipping
Cheeses
- 2 cups shredded mozzarella cheese
- About 1/4 cup grated Parmesan cheese
Meats and Proteins
- About 8 ounces cooked sausage (for 6 pizza skulls)
- About 6 ounces mini pepperoni (for 6 pizza skulls)
- Sliced ham, chopped (quantity as desired)
- Crumbled crispy bacon (quantity as desired)
- Mini Italian meatballs (quantity as desired)
Vegetables and Herbs
- Black olives, sliced (quantity as desired)
- Cooked corn kernels (quantity as desired)
- Baby spinach (quantity as desired)
- Fresh basil (quantity as desired)
- Chopped parsley or basil for garnish (optional)
Instructions
- Prepare the baking tin: Spray the mini skull baking tin with cooking spray to prevent sticking and ensure easy removal after baking.
- Roll out the dough: Lightly dust your counter with flour to prevent sticking. Roll, pat, or stretch the pizza dough until it’s about 1/4 inch thick. Cut the dough into 6 rectangles; they don’t need to be perfectly shaped.
- Fill the dough: Place each dough rectangle into a skull cavity on the baking tin. Add a layer of pizza sauce, then mozzarella cheese, a sprinkle of Parmesan, and your preferred toppings such as sausage, pepperoni, olives, ham, bacon, meatballs, corn, spinach, or basil. Add a little pizza sauce on top (no more than a tablespoon).
- Seal the pizza skulls: Fold the dough over the fillings and pinch the edges to seal like a pocket, ensuring no filling escapes during baking. Repeat for all 6 pieces.
- Chill before baking: Refrigerate the filled skull pizza tray while you preheat the oven to 400°F (200°C).
- Bake the pizza skulls: Remove the tray from the fridge and bake for 16 to 20 minutes, or until the dough is lightly golden brown. Baking time may vary depending on your dough brand.
- Cool and serve: Allow the pizza skulls to cool for 5 minutes in the tin before unmolding. Serve warm with marinara sauce for dipping and garnish with chopped parsley or basil if desired.
Notes
- These cheesy Pizza Skulls are perfect for Halloween celebrations and make a fun, kid-friendly dinner option.
- You can customize the toppings based on your preferences or what you have on hand.
- Ensure you tightly seal the dough pockets to prevent leaking during baking.
- Use fresh herbs like basil or parsley for a burst of flavor and attractive garnish.
- If you do not have a mini skull baking tin, use any small muffin or mini pie tin as a substitute.
Nutrition
- Serving Size: 1 pizza skull
- Calories: 270 kcal
- Sugar: 5 g
- Sodium: 839 mg
- Fat: 10 g
- Saturated Fat: 5 g
- Unsaturated Fat: 3 g
- Trans Fat: 0 g
- Carbohydrates: 32 g
- Fiber: 1 g
- Protein: 13 g
- Cholesterol: 29 mg


