
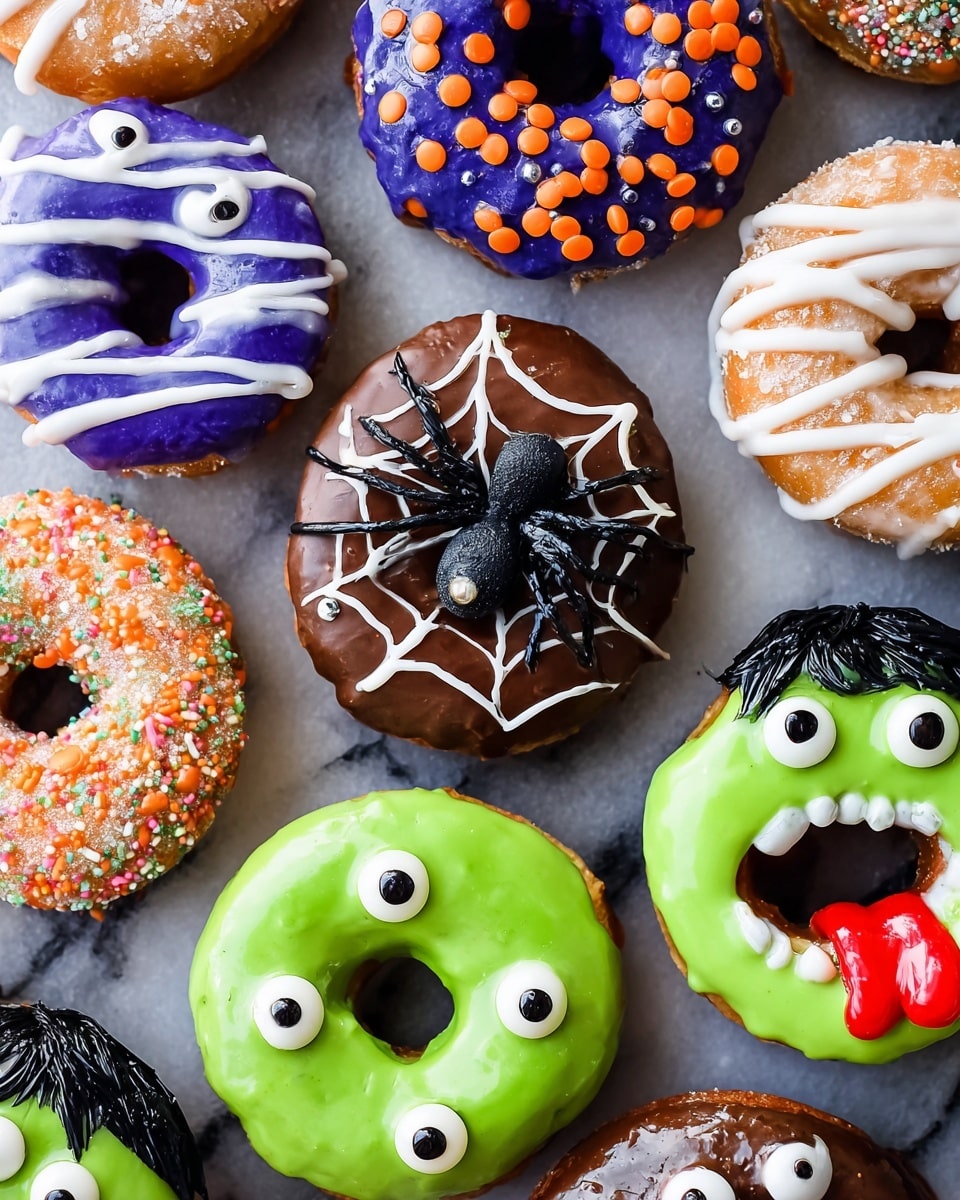
If you’re looking for a treat that’s as fun to make as it is to eat, you’re going to adore this Halloween Donuts Recipe. I absolutely love how these donuts come together with simple ingredients but pack a big punch in festive flair and flavor. Whether you’re making them for a party, a school event, or just some spooky fun at home, these donuts are soft, sweet, and irresistibly cute with all their candy eyes and colorful candy melts. Stick around — I’ll walk you through every step so your Halloween donuts turn out just perfect every time!
Why You’ll Love This Recipe
- Easy to Decorate: You don’t have to be a pro baker or decorator to get dazzling results — candy melts and candy eyes do most of the heavy lifting.
- Perfect for Kids: My kids go wild for these because they get to help add eyes and sprinkles, making it a fun family project.
- Versatile and Customizable: You can switch up colors and decorations to match any spooky theme or personal style.
- Quick and Ready to Serve: From start to finish, you’ll have a batch ready in about 30 minutes, making it ideal for last-minute celebrations.

Ingredients You’ll Need
These ingredients are simple but thoughtfully chosen so the candy melts create smooth, shiny coatings that harden perfectly, while the donuts provide that soft, tender base. You won’t need a million specialty items — most of these are available at your local grocery or craft store.
- Glazed Donuts or Bars: I prefer fresh glazed donuts with a light, pillowy texture to absorb some of the candy melts without getting soggy.
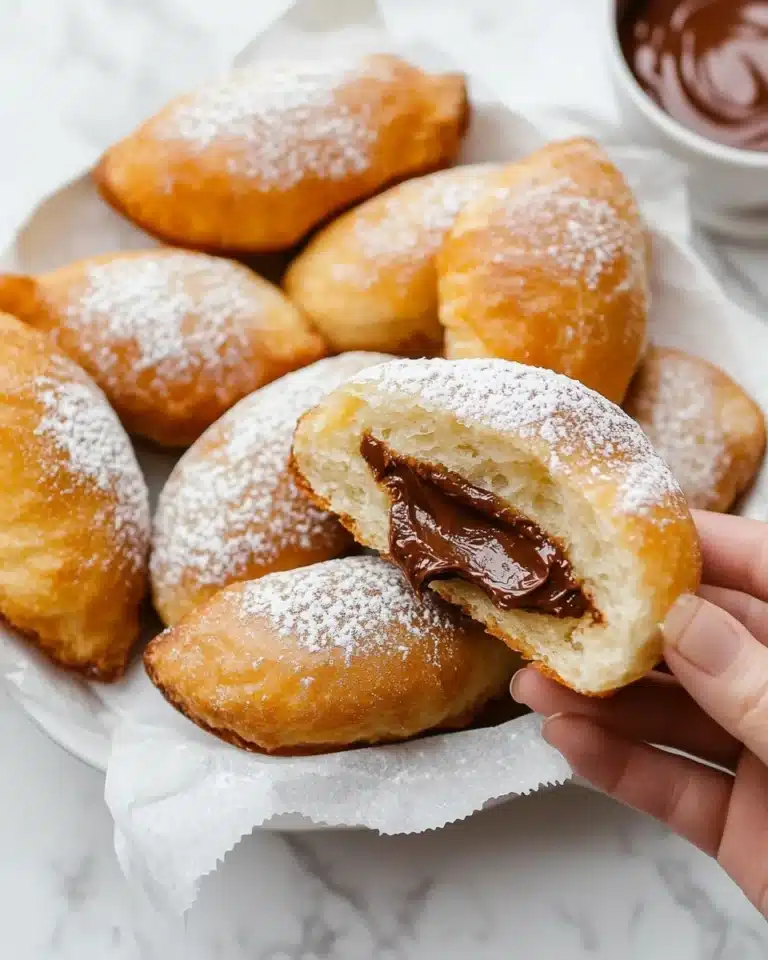
- Filled Glazed Donuts: These add a bit of surprise inside—my favorites are jelly or cream-filled for extra yum.
- Purple Candy Melts: Perfect for spooky, witchy hues and easy to melt without burning.
- Green Candy Melts: These give your treats a classic Halloween vibe — think monsters and ooze.
- Refined Coconut Oil or Shortening: Adding this to candy melts helps them smooth out and coat even better for that beautiful shine.
- Candy Eyes (various sizes): The real stars of the show — I like having a mix of sizes to create playful monster faces.
- Black Frosting: Great for drawing details and adding spooky accents with piping bags and tips.
- Bright White Candy Melts: Use these to make ghostly effects or highlight eyes and details.
- Red Decorating Food Gel Icing: Just a touch for that creepy “blood” drip effect that makes these donuts really pop.
- Chocolate Frosted Donuts: These are a delicious variation and create a nice contrast with bright candy melts.
- Plastic Fangs and Spiders: For a fun 3D touch that feels extra playful on top of the donuts.
- Piping Bags and Various Piping Tips (#104, #8, #3): These give you precision for decorating, but don’t worry if you don’t have fancy tips — toothpicks or plastic sandwich bags with a tiny cut corner work just fine.
Variations
I love putting my own spin on this Halloween Donuts Recipe depending on the mood and occasion. Feel free to play around with colors, flavors, or even try a vegan twist by swapping donut types and frostings. It’s so fun to make these your own!
- Spooky Monster Donuts: I once experimented with bright neon candy melts to create wild monster faces that glowed under blacklight at a Halloween party — such a hit!
- Vegan Version: Try using vegan donuts and dairy-free candy melts, and swap black frosting for naturally colored fruit purees or vegan icing.
- Gluten-Free Variation: Use gluten-free donuts or donut holes as a quick adjustment that everyone can enjoy.
- Mini Donut Bites: Make these as bite-sized treats for easier snacking at school or work parties.
How to Make Halloween Donuts Recipe
Step 1: Prep Your Workspace and Supplies
Before diving in, line one or two baking sheets with parchment paper—this is where your decorated donuts will dry without sticking. Gather your donuts, candy melts, coconut oil or shortening, candy eyes, and piping bags. Having everything ready upfront helps the decorating flow smoothly, especially since melted candy sets fast.
Step 2: Melt and Thin the Candy Melts
Place the candy melts in microwave-safe bowls and zap them in 30-second intervals, stirring gently after each cycle. Add 2 to 4 tablespoons of refined coconut oil or shortening to the melts to achieve a silky, smooth consistency — this makes coating the donuts easier and gives them that gorgeous shine I’m always chasing. Just be careful not to overheat; gentle stirring and short bursts save you from grainy candy.
Step 3: Dip and Decorate Your Donuts
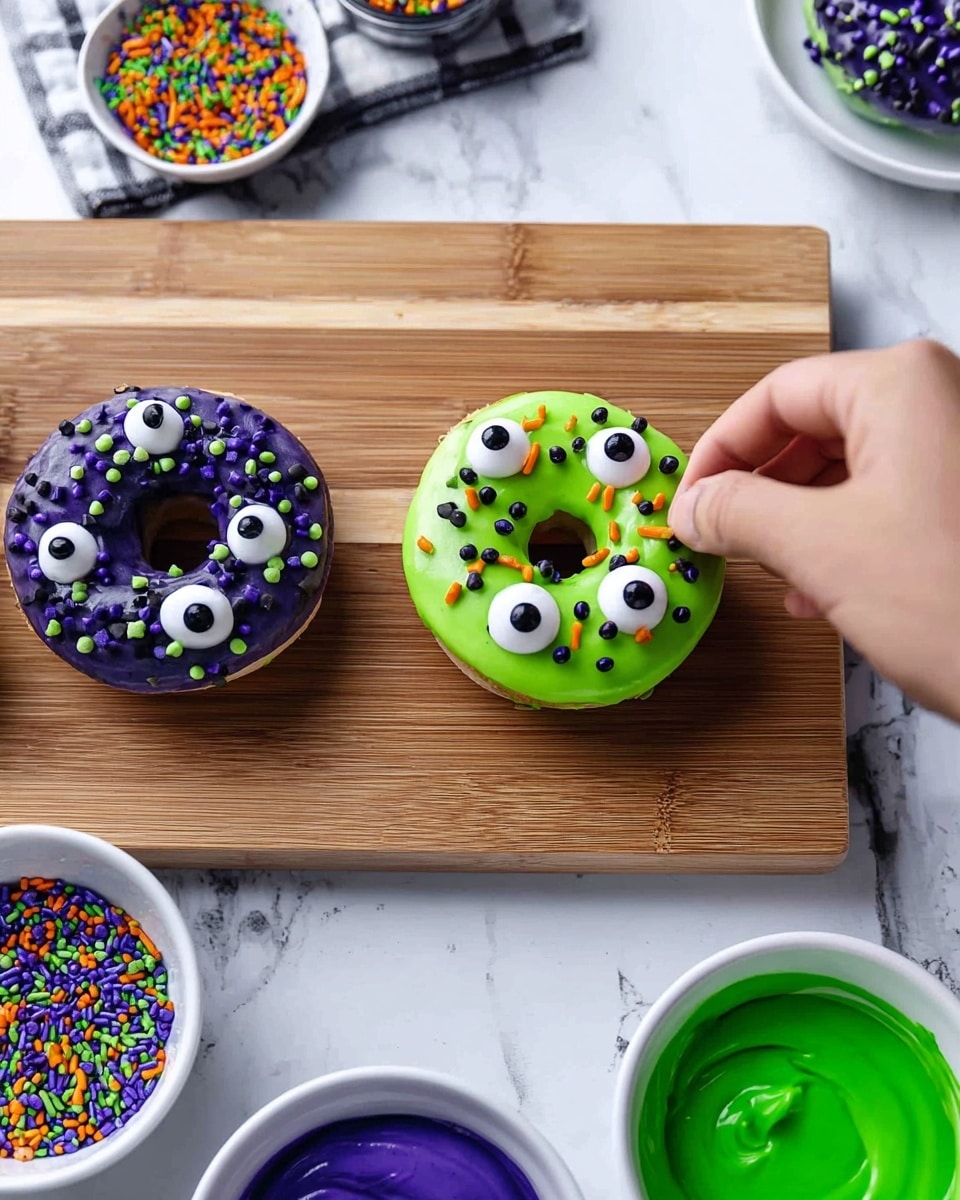
Here’s where your creativity can shine! For each donut, gently dip a side into the melted candy, letting the excess drip off before setting it on your parchment-lined sheet. Quickly add candy eyes and sprinkles while the coating is still sticky. For added dimension, use black frosting with piping bags to draw mouths, spider webs, or creepy swirls once the candy coating sets but is still a little tacky. I like to use different sized eyes to create a playful, monster-like look that my family goes crazy for.
Step 4: Add 3D Decorations and Final Touches
For a showstopper effect, attach plastic fangs, spiders, or use red decorating gel icing to create “blood” drips. Use your piping tips to add fine details and highlights in contrasting colors. The best part? These add-ons make your donuts stand out and really embrace that Halloween spirit!
Step 5: Let Your Donuts Dry Completely
Patience is key here. Allow your decorated donuts to sit at room temperature on the parchment-lined baking sheet until the candy melts harden fully. This usually takes about 30 minutes. If you’re in a hurry, a quick chill in the fridge helps set them faster but avoid touching them while cold to keep your decorations intact.
Pro Tips for Making Halloween Donuts Recipe
- Candy Melts Consistency: Always add a bit of coconut oil or shortening to candy melts for easy dipping and a glossy finish — it took me a few tries to perfect this part!
- Work Quickly: Candy sets fast, so have decorations ready to go and try dipping only a few donuts at a time.
- Use Parchment Paper: This prevents sticking and makes cleanup super easy — trust me, I learned this the hard way with a sticky mess.
- Room Temperature Donuts: Avoid refrigerated donuts for dipping since moisture can cause the candy to seize or not stick well.
How to Serve Halloween Donuts Recipe
Garnishes
I love topping these donuts with additional sprinkles like edible glitter or Halloween-themed confetti for an extra pop. Sometimes I add little candy pumpkins or edible eyes right before serving to make them look fresh and festive.
Side Dishes
Pair these Halloween donuts with a warm cup of spiced apple cider or a creamy hot chocolate to balance the sweetness. For a savory contrast, crispy bacon or mini sausage links work surprisingly well alongside these treats.
Creative Ways to Present
For a party, I like to arrange the donuts on a tiered cake stand or a large wooden board decorated with candy corn, fake cobwebs, and mini pumpkins. You could also serve them in individual clear treat boxes tied with orange and black ribbons for easy grab-and-go favors.
Make Ahead and Storage
Storing Leftovers
I store leftover Halloween donuts in an airtight container at room temperature — this keeps them soft and fresh for about 2 days. Avoid the fridge if you want to maintain that tender donut texture and shiny candy coating.
Freezing
If you want to make these ahead for a busy week, freeze undecorated donuts wrapped tightly in plastic wrap and placed in a freezer bag. When ready to decorate, thaw completely at room temperature, then proceed with the candy melts and decorating steps.
Reheating
I don’t recommend microwaving decorated donuts as it can melt the candy coating and decorations. Instead, enjoy them fresh or at room temperature; if you want a warm donut without messing with the decorations, try reheating an undecorated donut separately.
FAQs
-
Can I use homemade donuts for this Halloween Donuts Recipe?
Absolutely! Homemade glazed or filled donuts work beautifully with this recipe. Just make sure they are cooled completely before decorating so the candy melts adhere properly and don’t melt the donuts.
-
How do I prevent candy melts from seizing?
Melting candy melts over low heat or in short microwave bursts with stirring helps prevent seizing. Adding a bit of refined coconut oil or shortening thins the melts and keeps the texture smooth and glossy.
-
Can I prepare Halloween donuts ahead of time?
You can prep donuts ahead, especially undecorated ones. The decorated donuts taste best fresh, but if needed, store them at room temperature in an airtight container and decorate within 1-2 days for optimal freshness.
-
What if I don’t have candy eyes?
No worries! You can make eyes using small dots of white and black frosting with a fine piping tip or even use mini chocolate chips. It’s a great way to personalize your donuts even without store-bought candy eyes.
Final Thoughts
This Halloween Donuts Recipe holds a special place in my heart because it brings a bit of magic and joy to the kitchen every fall. I love seeing the smiles as the kids come running to help decorate, and the adults can’t get enough of the fun, festive flavors. These donuts are simple, playful, and perfect for creating memories that stick long after the last crumb is gone. Give it a try — I promise, you’ll find yourself making these year after year!
Print
Halloween Donuts Recipe
- Prep Time: 10 min
- Cook Time: 20 min
- Total Time: 30 min
- Yield: 36 Donuts
- Category: Dessert
- Method: No-Cook
- Cuisine: American
Description
Celebrate the spooky season with these festive Halloween Donuts. Soft, sweet glazed and filled donuts are transformed with colorful candy melts, candy eyes, sprinkles, and fun decorations like plastic fangs and spiders. Easy to assemble and perfect for Halloween parties or treats, these donuts combine creativity with delicious flavors for a memorable holiday snack.
Ingredients
Donuts
- ½ Dozen Glazed Donuts or Bars
- ½ Dozen Filled Glazed Donuts
- ½ Dozen Filled Donuts or Bars
- ½ Dozen Glazed Donuts
- ½ Dozen Chocolate Frosted Donuts
Candy Coating and Decorations
- 6 oz Purple Candy Melts
- 6 oz Green Candy Melts
- 6 oz Bright White Candy Melts (6 oz + 12 oz for two sections)
- 2-6 tbs Refined Coconut Oil or Shortening (varies per section)
- Candy Eyes (various sizes) – at least 36 total
- Sprinkles of choice
- 12 Candy Eyes (for specific donut sets)
- 1-2 cups Black Frosting
- 6 Plastic Fangs
- 6 Plastic Spiders
- Red Decorating Food Gel Icing
Tools
- Piping Bags
- #104 Piping Tip
- #8 Piping Tip (or 7mm Writing Tip)
- #3 Piping Tip
Instructions
- Prepare Work Surface: Line 1 or 2 baking sheets with parchment paper to provide a clean drying area for the decorated donuts.
- Melt Candy Coatings: Gently melt purple, green, and bright white candy melts separately, combining with 2-6 tablespoons of refined coconut oil or shortening to achieve a smooth, dip-ready consistency.
- Decorate Filled Glazed Donuts or Bars: Dip or drizzle donuts in purple and green candy melts, adding sprinkles and candy eyes while coating is still wet to adhere decorations.
- Decorate Filled Donuts or Bars with Green Candy Melts: Use green candy melts to coat donuts, then affix candy eyes using a small amount of black frosting as glue.
- Decorate Glazed Donuts with White Candy Melts: Coat glazed donuts with bright white candy melts and adhere candy eyes, allowing the coating to set on parchment paper.
- Decorate Glazed Donuts with Black Frosting and Fangs: Use black frosting to create spooky faces on glazed donuts, attach candy eyes and plastic fangs, and add red decorating gel icing for added effect.
- Decorate Chocolate Frosted Donuts: Dip or drizzle chocolate frosted donuts with bright white candy melts mixed with coconut oil. Embellish with plastic spiders while the coating is still tacky.
- Use Piping Bags and Tips: Employ piping bags fitted with #104, #8 (or 7mm), and #3 tips to add detailed designs and accents with frosting and decorating gels.
- Dry and Set: Place all decorated donuts on the prepared parchment-lined baking sheets and allow them to dry completely, ensuring all coatings and decorations are firmly set.
Notes
- Celebrate the season with Halloween Donuts—soft, sweet, and easy to decorate for a spooky, festive treat.
- Use refined coconut oil to thin candy melts without affecting flavor.
- Ensure candy melts are not overheated to avoid graininess.
- Allow ample drying time for decorations to set before serving or packaging.
- Plastic decorations such as fangs and spiders are for decorative purposes; remove before eating.
Nutrition
- Serving Size: 1 Donut
- Calories: 200 kcal
- Sugar: 15 g
- Sodium: 150 mg
- Fat: 10 g
- Saturated Fat: 6 g
- Unsaturated Fat: 3 g
- Trans Fat: 0 g
- Carbohydrates: 25 g
- Fiber: 1 g
- Protein: 3 g
- Cholesterol: 15 mg
