
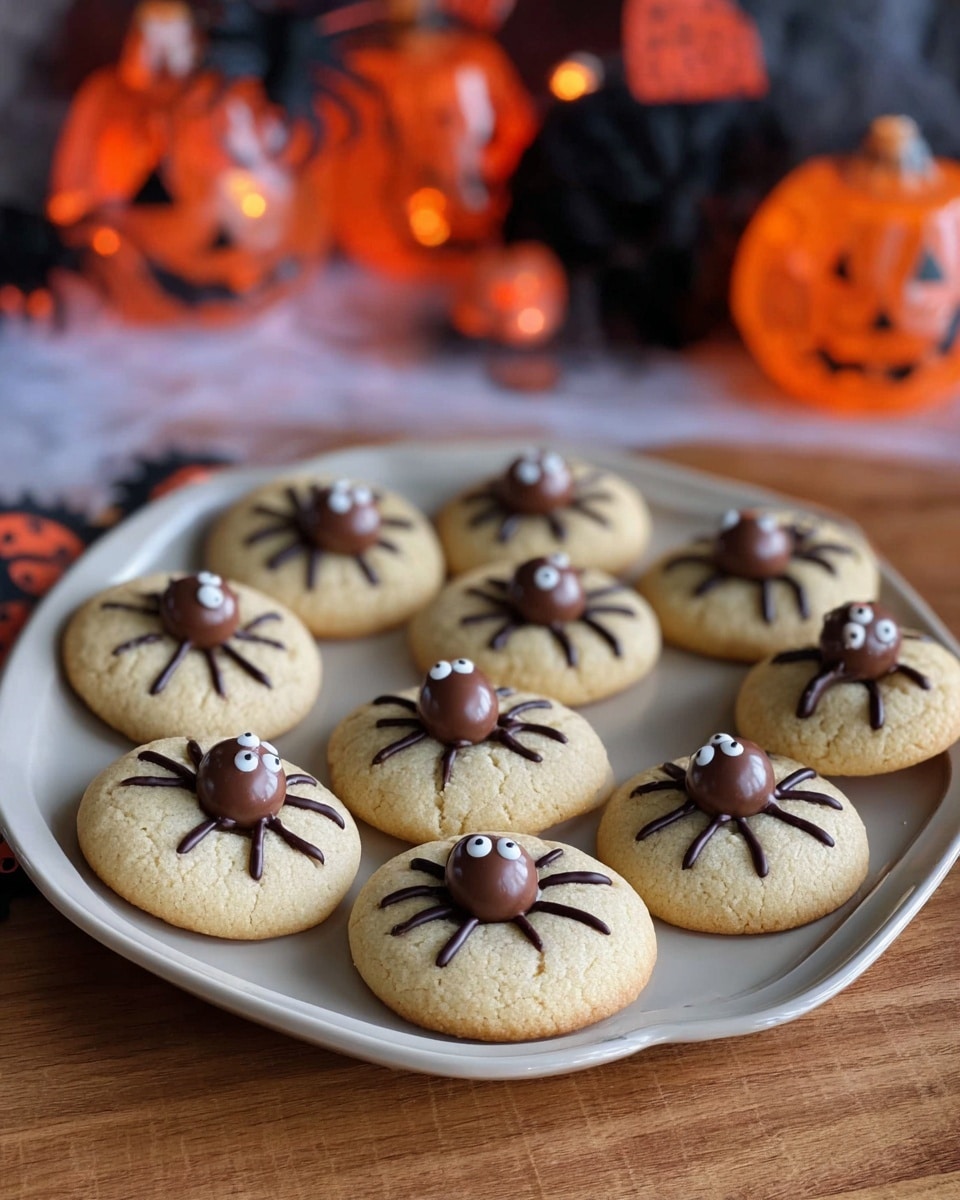
If you’re looking for a delightfully spooky treat to impress your friends and family this season, let me introduce you to my all-time favorite Halloween Spider Cookies Recipe. These cookies are not only irresistibly chewy and chocolatey but also feature adorable spider legs and eyes that make them perfect for your Halloween celebrations. Whether you’re baking with kids or hosting a party, this recipe is a fun, festive way to add some creepy-crawly charm to your dessert table. Trust me, once you try these, you’ll be making them every year!
Why You’ll Love This Recipe
- Easy to Make: This Halloween Spider Cookies Recipe uses simple ingredients and straightforward steps that anyone can follow—even if cookie baking isn’t your usual thing.
- Fun & Festive Design: The chocolate spider legs and Malteser eyes transform ordinary cookies into a spooky treat kids and adults adore.
- Soft & Chewy Texture: I absolutely love how these cookies bake up golden and soft in the center, which adds to their irresistible appeal.
- Perfect for Parties: Whether it’s a classroom event, family gathering, or Halloween party, these cookies are always a crowd-pleaser and conversation starter.

Ingredients You’ll Need
The magic behind these Halloween Spider Cookies Recipe comes down to a few pantry staples mixed with a couple of festive finishing touches. Each ingredient plays a role in creating the perfect balance between sweet, chewy, and visually fun.
- Butter: Unsalted butter melted to add richness and moisture, making the cookies soft.
- Brown sugar: Gives a slight caramel note and chewiness, which I really love in these cookies.
- White sugar: Adds sweetness and helps with a tender texture.
- Egg: Binds everything together and adds extra moisture for softness.
- Vanilla essence: A little sprinkle of warmth and depth to the flavor.
- Plain flour: The base for the cookie dough that gives structure.
- Salt: Balances the sweetness and enhances the other flavors.
- Baking soda: Helps the cookies rise slightly and become airy without losing their softness.
- Cornflour: A secret ingredient I discovered that makes the crumb extra tender and soft.
- Maltesers: These are the cutest little spider eyes and body! Their crunch contrasts beautifully with the soft cookie.
- Dark chocolate (melted): Used to pipe the spider legs—dark chocolate adds a sharp richness that pairs perfectly with the cookie.
- White icing: For those tiny spider eyes, giving your creepy critters a fun and finished look.
Variations
I love that you can tweak this Halloween Spider Cookies Recipe to suit different tastes or dietary needs. I often experiment with a few fun twists depending on what I have in the pantry or who I’m baking for.
- Nut-free Version: Swap regular Maltesers for nut-free chocolates or candy eyeballs if allergies are a concern—I’ve done this for school parties and it worked perfectly.
- Mint Chocolate: Add a teaspoon of peppermint extract to the dough and use mint-flavored chocolates for the legs for a refreshing seasonal twist.
- Gluten-free Version: Use a gluten-free flour blend with xanthan gum to replicate the texture—my GF friends loved when I made these last Halloween.
- More Crunchy Cookie: Replace some cornflour with oats or chopped nuts for extra texture if you prefer a less soft cookie.
How to Make Halloween Spider Cookies Recipe
Step 1: Melt and Mix Your Base
Start by melting your butter in a large glass bowl—30 to 50 seconds in the microwave usually does the trick. Whisk it gently to smooth out any lumps, then add both brown and white sugar, your egg, and vanilla essence. I like to mix this until it’s silky smooth because that gives the dough a lovely consistency for when you add the dry ingredients.
Step 2: Add Your Dry Ingredients
Next, sift together plain flour, salt, baking soda, and cornflour right over your butter mixture—this helps avoid clumps and makes folding in smoother. Gently fold the dry into the wet until just combined; you want to be careful not to overmix. The dough will feel quite soft but also thick at this stage. If the dough feels too warm or sticky to roll, pop it into the fridge or freezer briefly to firm up—that little chill makes rolling balls so much easier.
Step 3: Shape and Bake
Preheat your oven to 170°C fanbake (or 340°F if you’re on Fahrenheit). Roll your dough into balls using about 2 tablespoons (30-40g) each. Place them on a lined baking tray and gently press them down so they’re slightly flattened. These cookies bake for 12-15 minutes—watch for golden edges but soft centers, that’s the sweet spot for the chewy texture I love. Don’t overbake or you’ll lose that gorgeous softness!
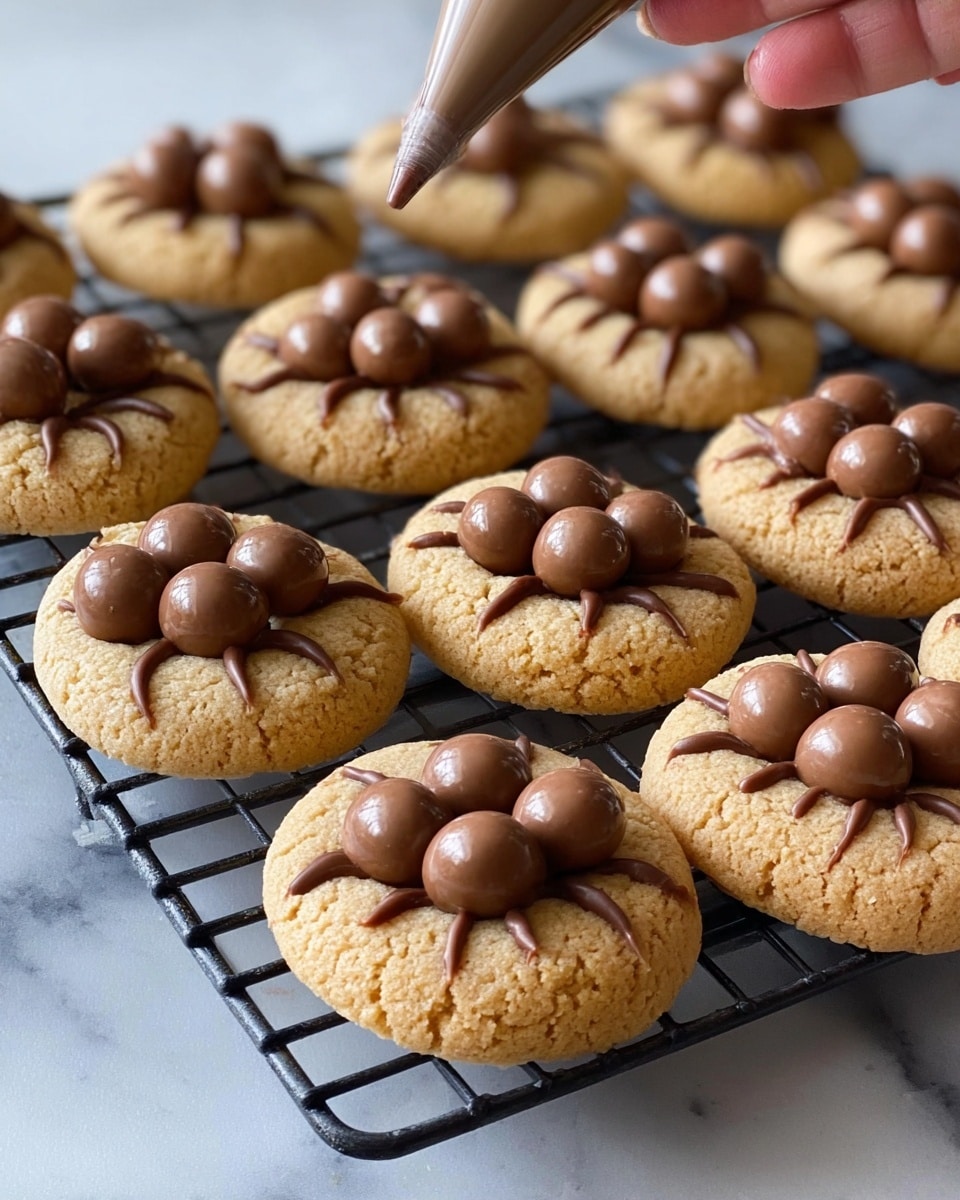
Step 4: Create Your Spiders
Once the cookies are out and still warm, press two Maltesers into each cookie to form the spider bodies and eyes. After about 10 minutes, transfer them to a wire rack to cool completely. Meanwhile, melt your dark chocolate and spoon it into a small ziplock bag, cutting a tiny hole in one corner to pipe spider legs—four legs on each side. I use white icing to dot the eyeballs and add small chocolate dots inside for that fun, spooky eye effect.
Step 5: Let Them Set and Enjoy
Give the chocolate legs and icing eyes a chance to firm up before serving—about an hour at room temperature usually does it. Then you’re ready to wow your guests with these creepy-cute cookies that taste even better than they look!
Pro Tips for Making Halloween Spider Cookies Recipe
- Don’t Skip Chilling: I learned the hard way that soft cookie dough can be tough to handle—chilling makes rolling a breeze and prevents misshapen cookies.
- Watch Bake Time Closely: Setting a timer is crucial. Cookies that are done just as the edges turn golden remain soft and chewy inside.
- Use Quality Chocolate: Good dark chocolate melts smoothly and pipes neatly for the legs—cheap chocolate can seize and frustrate you.
- Assemble While Warm: Adding the Maltesers while cookies are warm helps them stick perfectly—waiting too long makes attaching harder.
How to Serve Halloween Spider Cookies Recipe
Garnishes
I usually stick with the Maltesers and icing eyes for these cookies because they’re just so effective and simple. But sometimes I add a light dusting of cocoa powder or edible glitter for a little extra Halloween sparkle—kids love that fun touch!
Side Dishes
These cookies stand out on their own, but if you’re putting together a Halloween spread, I like pairing them with spooky punch drinks, popcorn balls, or a simple vanilla or pumpkin-flavored iced latte. The cookies’ chocolaty richness complements these drinks beautifully.
Creative Ways to Present
For a party, I love displaying these Halloween Spider Cookies Recipe on black or orange platters, surrounded by fake spider webs and tiny plastic spiders to amp up the creepy vibe. Another fun idea is to place them on individual cupcake liners or small plates with mini spider rings or Halloween confetti for festive flair.
Make Ahead and Storage
Storing Leftovers
I store these cookies in an airtight container at room temperature, layering them between sheets of parchment paper to keep the chocolate legs intact. They usually stay soft and delicious for up to a week—if they last that long!
Freezing
You can freeze the plain cookie dough balls before baking—just lay them on a tray, freeze till solid, then transfer to a ziplock bag. When you want, bake straight from frozen, adding a couple extra minutes to the bake time. I don’t recommend freezing fully decorated cookies, though, as the chocolate spider legs tend to get fragile.
Reheating
If you want to freshen up leftover cookies, gently warm them in a microwave for 10-15 seconds or briefly in a low-heat oven. This softens them back up and revives that fresh-baked feel without melting the decorations.
FAQs
-
Can I use other chocolates instead of Maltesers for the spider eyes?
Absolutely! While Maltesers are perfect because of their size and texture, you can use any small, round chocolate candies like chocolate chips, mini peanut butter cups, or candy eyeballs. Just pick something that sticks well while the cookie is warm.
-
Will the cookies stay soft if I make them in advance?
Yes, if stored properly in an airtight container, these cookies hold their soft texture for up to a week. Just avoid refrigeration, which can dry them out. If they firm up a bit, a quick warm-up helps restore softness.
-
Can I make these cookies vegan?
You can try substituting the butter with vegan margarine and use a flax or chia egg in place of the egg. Keep in mind that the texture may be slightly different, and you’ll want to confirm your chocolate and icing are also vegan-friendly.
-
How do I prevent the chocolate legs from smudging?
Make sure the cookies are completely cool before piping spider legs with melted chocolate. Then let the legs harden undisturbed at room temperature or in the fridge for faster setting. Avoid stacking them until the chocolate is firm.
Final Thoughts
This Halloween Spider Cookies Recipe feels like a little slice of Halloween magic every time I bake it. The combo of soft, chewy cookies with playful, spooky decorations makes it a recipe I go back to year after year. I hope you have as much fun making them as my family and I do—and trust me, everyone will go crazy for these on your spooky treat table. So grab your apron, gather your ingredients, and let’s make some creepy-cute memories!
Print
Halloween Spider Cookies Recipe
- Prep Time: 20 min
- Cook Time: 12 min
- Total Time: 32 min
- Yield: 20 cookies
- Category: Dessert
- Method: Baking
- Cuisine: Western
Description
These Halloween Spider Cookies are fun, chewy treats perfect for spooky celebrations. Soft buttery cookies are topped with chocolate spiders made from Maltesers, melted dark chocolate legs, and white icing eyes, making them as delightful to look at as they are to eat.
Ingredients
Cookie Dough
- 150g butter
- ½ cup brown sugar (100g)
- ½ cup white sugar (110g)
- 1 egg
- 1 tsp vanilla essence
- 2 cups plain flour (300g)
- ¼ tsp salt
- 1 tsp baking soda
- 2 Tbsp cornflour
Topping
- 140g bag Maltesers
- 100g dark chocolate, melted
- 1 small tube white icing
Instructions
- Melt Butter. In a large glass bowl, melt the butter in the microwave for 30 to 50 seconds until mostly liquid.
- Mix Wet Ingredients. Whisk the melted butter, then add brown sugar, white sugar, egg, and vanilla essence. Mix thoroughly until smooth and lump-free.
- Combine Dry Ingredients. Sift the plain flour, salt, baking soda, and cornflour over the wet mixture. Fold gently until combined into a soft but thick dough.
- Chill Dough if Needed. If the dough feels warm and very soft, chill it in the fridge or freezer until firm enough to roll into balls.
- Preheat Oven. Preheat your oven to 170°C fanbake (around 338°F).
- Shape Cookies. Roll the dough into balls about 2 tablespoons (30-40g) each. Place them on a lined baking tray and gently press down slightly to flatten.
- Bake Cookies. Bake for 12-15 minutes until the edges are golden but the centers remain soft. Remove from the oven.
- Add Maltesers. While cookies are still warm, press two Maltesers into the top of each cookie to form the spider’s body.
- Cool Cookies. Let cookies rest on the tray for 10 minutes, then transfer to a wire rack to cool completely.
- Melt Chocolate and Prepare Piping Bag. Melt the dark chocolate and place it into a small ziplock bag, cutting a tiny hole in one corner for piping.
- Pipe Spider Legs. Pipe four chocolate legs on each side of the Maltesers on every cookie to form spider legs.
- Add Eyes. Use the white icing to pipe two dots on each Malteser body for eyes, then add a small dot of melted chocolate inside each white dot to create eyeballs.
- Let Decorations Set. Allow the chocolate legs and eyes to harden completely before serving.
- Storage. Store finished cookies in an airtight container for up to one week to maintain freshness.
Notes
- Delicious, chewy cookies with a fun chocolate spider on top!
- Ensure dough is chilled enough to handle for easier shaping.
- Use fanbake setting for even baking and golden edges.
- Decorate once cookies have cooled slightly to avoid melting the chocolate and icing.
- Store in an airtight container to keep cookies soft and fresh for up to 1 week.
Nutrition
- Serving Size: 1 cookie
- Calories: 211
- Sugar: 17g
- Sodium: 156mg
- Fat: 10g
- Saturated Fat: 6g
- Unsaturated Fat: 3g
- Trans Fat: 0g
- Carbohydrates: 28g
- Fiber: 1g
- Protein: 2g
- Cholesterol: 27mg


