
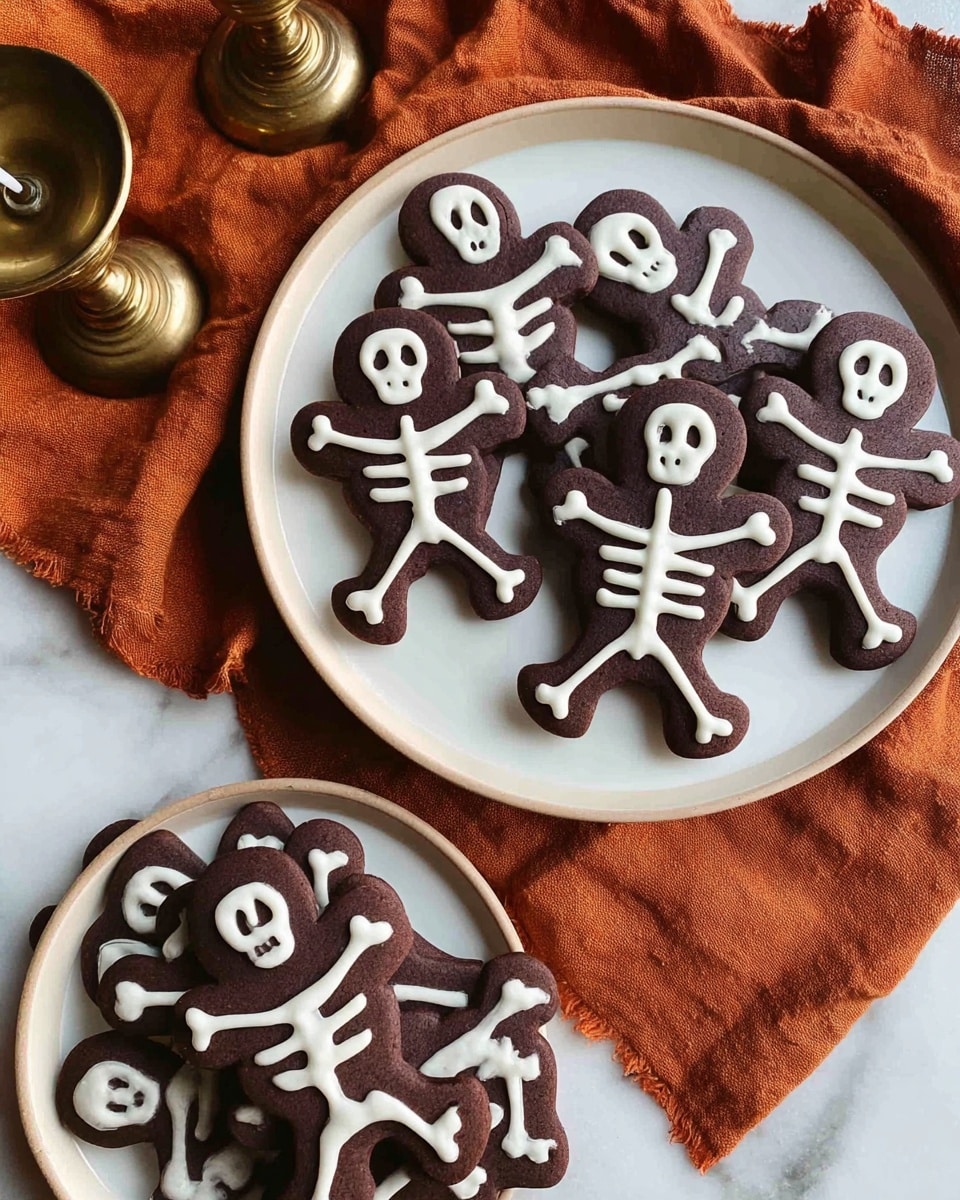
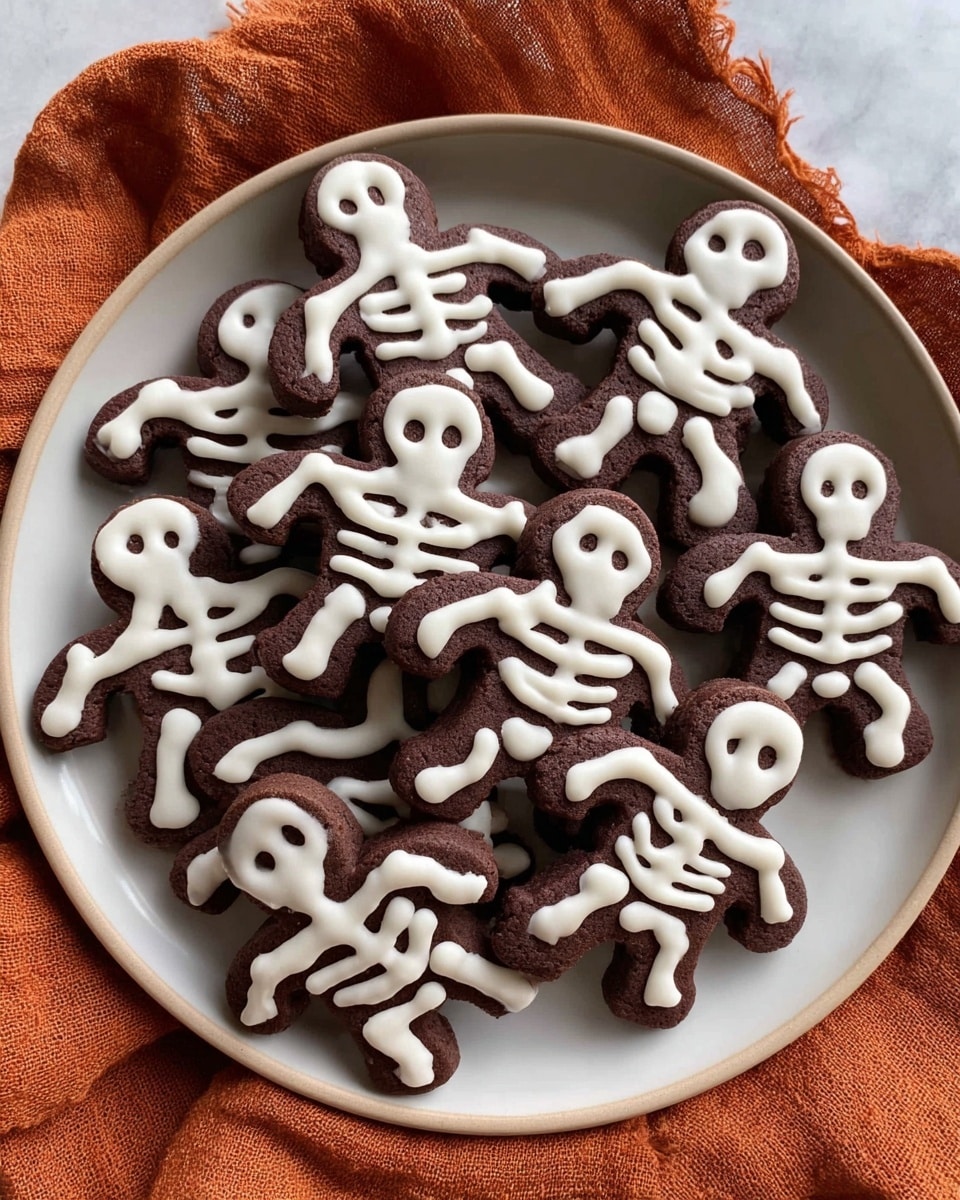
If you’re looking for a festive treat with a fun twist, you’ll absolutely adore this Skeleton Cookies with White Chocolate Icing Recipe. These chocolate-flavored shortbread cookies decorated with delicate white chocolate skeletons are as delightful to look at as they are delicious to eat. Whether you’re baking for Halloween, a spooky party, or just craving something playful, this recipe is fan-freaking-tastic—and I’m excited to share every little detail to make sure you nail it in your kitchen.
Why You’ll Love This Recipe
- Perfect Balance of Flavors: The cocoa gives a rich depth while the buttery shortbread texture keeps them tender and melt-in-your-mouth.
- Fun and Festive Decoration: Icing with melted white chocolate skeletons makes these cookies a showstopper for any spooky celebration.
- Simple Step-by-Step Process: You don’t need to be a master baker to pull these off—just a bit of patience and love.
- Great for Sharing: These cookies store well and are perfect gifts or party treats that everyone will go crazy for.

Ingredients You’ll Need
Let’s talk ingredients! This Skeleton Cookies with White Chocolate Icing Recipe keeps it simple but special. Each one plays a role in getting you that perfect texture and flavor combination you’ll want to bake again and again.
- Salted butter: Using salted butter gives just the right touch of seasoning while helping with cookie tenderness.
- Icing sugar: This fine sugar blends smoothly without any grittiness, ensuring your dough is silky and soft.
- Cornflour: It’s the secret weapon for that melt-in-your-mouth shortbread texture.
- Cocoa powder: Adds a rich chocolate flavor and beautiful dark hue to the cookies.
- Plain flour: The sturdy base that holds your cookie dough together perfectly.
- White chocolate: This melts beautifully for piping your skeleton icing and contrasts so nicely with the dark cookie.
Variations
I love how versatile this Skeleton Cookies with White Chocolate Icing Recipe is—it’s perfect as is, but sometimes I like to switch things up to match the mood or my pantry supplies. Feel free to get creative and make these your own.
- Use dark or milk chocolate icing: If you prefer, swap the white chocolate for dark or milk chocolate for a different color contrast and flavor profile. I used to stick strictly to white chocolate, but incorporating dark chocolate adds a sophisticated twist I now adore.
- Gluten-free option: Replace plain flour with a gluten-free blend for an allergy-friendly version. I tested this once and it worked surprisingly well; just watch the dough texture as you might need to adjust flour slightly.
- Add spices: Mix a pinch of cinnamon or chili powder into the dough for a subtle warmth. My family goes crazy for that little surprise in their cookies!
- Colored icing: Tint melted white chocolate with food-safe colors if you want colorful skeletons for a playful look.
How to Make Skeleton Cookies with White Chocolate Icing Recipe
Step 1: Cream the Butter and Sugar
Start by cutting your softened salted butter into cubes and dropping them into the mixer bowl. I like to beat it for a few minutes with the icing sugar until the mixture turns pale and fluffy—that’s when you know you’ve incorporated enough air to get that lovely delicate texture in your cookies. If you skip this step or rush it, your cookies can turn dense, so take your time here. I usually set a timer so I don’t get distracted!
Step 2: Mix in the Dry Ingredients
Sift together the cornflour, cocoa powder, and plain flour to avoid clumps, then add them to the butter and sugar on low speed. You’ll see the dough beginning to come together. This part can feel crumbly—don’t worry! If it looks too dry, you can gently press the dough in your hands to bring it together. I discovered this trick after my first few batches where the dough was too crumbly to roll out smoothly.
Step 3: Chill the Dough
Roll your dough into a ball and pop it into cling film before refrigerating for about 30 minutes. Chilling is key here—it makes rolling easier and helps your cookies keep their shape in the oven. I once skipped chilling and my cookies ended up spreading much more than I liked.
Step 4: Roll Out and Cut Cookies
Lightly flour your bench and roll out the dough to about 1cm thickness. I find if you keep your hands cool and work quickly, the dough won’t get sticky. If edges look crumbly, gently press them back together before moving on. Then use your favorite people-shaped cutters—big or small—to cut out shapes. This part is a blast, especially if you have kids helping. Transfer the shapes carefully to lined baking trays.
Step 5: Bake to Perfection
Bake in a 160°C fan oven for 15 minutes. You want the edges to just start browning, but the cookies should still feel soft in the middle when you take them out. I like to keep an eye on the first batch to tweak timing with my oven—it’s a handy trick to avoid overbaking. Once baked, transfer to a wire rack to cool completely.
Step 6: Decorate with White Chocolate Icing
While your cookies cool, melt the white chocolate gently, making sure it’s smooth but not too runny. I like to use a double boiler or microwave in short bursts to avoid burning. When both cookies and chocolate are cool, pour melted chocolate into a snap-lock bag, snip off a tiny corner, and carefully pipe skeleton designs. This is where your cookies really come to life! Take your time here—this is your masterpiece moment.
Step 7: Let the Icing Set
Allow the chocolate skeletons to harden completely. Depending on your kitchen temperature, this can take 20–30 minutes. Once firm, you can serve your beautifully spooky cookies or store them in an airtight container for later. I remember the first time I served these at a party—the compliments just kept coming!
Pro Tips for Making Skeleton Cookies with White Chocolate Icing Recipe
- Room Temperature Butter: Starting with softened butter makes creaming easier and results in a smoother dough.
- Don’t Skip Chilling: Refrigerating the dough helps maintain the cookie shape and texture during baking.
- Use Parchment Paper or Silicone Mats: This prevents sticking and makes transferring cookies a breeze.
- Control Your Chocolate Flow: When piping skeletons, cut a small corner of the bag to avoid mess and get fine lines.
How to Serve Skeleton Cookies with White Chocolate Icing Recipe
Garnishes
I personally like to keep garnishes simple to let the skeletons shine, but a sprinkle of edible glitter or black sanding sugar around the edges adds a fun eerie sparkle. If you’re feeling adventurous, tiny candy eyeballs dot the cookie eye sockets—my niece loves this little detail!
Side Dishes
Pair these Skeleton Cookies with a warm spiced cider or a creamy hot chocolate—both complement the chocolate shortbread flavors beautifully. I’ve also served them alongside vanilla bean ice cream for dessert after a Halloween dinner, and my guests were thrilled!
Creative Ways to Present
For parties, I like arranging the cookies on a black or metallic tray lined with cobweb-patterned parchment paper—it creates an instant spooky vibe. You can also tie a few cookies in a clear cellophane bag with a ribbon and a Halloween tag to make cute treat favors. Last year, making a giant skeleton by arranging these cookies in a human shape was a huge hit at my daughter’s school event!
Make Ahead and Storage
Storing Leftovers
I always store leftover cookies in an airtight container at room temperature to keep them crisp but moist inside. They last nicely for up to 5 days this way. Just make sure they’re fully cooled and the chocolate has set before sealing the container to avoid any condensation or melting.
Freezing
If you want to freeze these, it’s best to freeze the plain baked cookies before icing. Wrap them well in plastic wrap and place in a freezer bag. When you’re ready to enjoy, thaw completely and then decorate with the white chocolate skeletons fresh. This keeps the cookies tasting their best and the icing looking perfect. I learned this the hard way after freezing decorated cookies once and having the icing crack.
Reheating
These cookies are best enjoyed at room temperature. If you want to eat them warm, gently microwave them for 5–10 seconds, but avoid longer times or the chocolate skeletons can melt. I often warm a cookie for a couple seconds and pair it with a cup of tea—that’s my cozy treat moment!
FAQs
-
Can I use unsalted butter instead of salted in this recipe?
Absolutely! If you use unsalted butter, just add a small pinch of salt to the dough to balance the flavors. Salted butter adds a bit of seasoning which enhances the cookie taste, but you can easily replicate this with unsalted butter plus salt.
-
What if I don’t have people-shaped cookie cutters?
No worries at all! You can use any cookie cutters you have on hand—pumpkins, ghosts, bats, or even simple circles. The fun of this Skeleton Cookies with White Chocolate Icing Recipe lies in the decoration, so get creative with shapes and have fun customizing your spooky designs.
-
How do I make sure my white chocolate doesn’t seize when melting?
To avoid seizing, melt the white chocolate slowly using a double boiler or microwave in short 15-second bursts, stirring often. Make sure no water gets into it, as even a tiny drop causes the chocolate to seize. Using good-quality chocolate also helps a lot!
-
Can I prepare these cookies ahead of time for a Halloween party?
Yes! You can bake the cookies a day or two ahead and store them airtight, icing them the day of your party. This keeps the skeleton icing fresh and prevents it from melting or smudging during storage.
-
Is this recipe suitable for beginners?
Definitely! The steps are straightforward, and even if you’re new to baking or decorating, the instructions and tips make it easy to succeed. I remember the first time I tried this recipe, I was no pro—but the results impressed everyone, including me!
Final Thoughts
This Skeleton Cookies with White Chocolate Icing Recipe holds a special place in my kitchen—it’s one of those rare finds that combines taste, fun, and festivity all in one. I’ve baked them with friends, gifted them to neighbors, and celebrated many spooky seasons with them. I hope you’ll love making and sharing these just as much as I do. So grab your mixer, some chocolate, and let your creativity run wild—I promise, these are worth every minute you spend in the kitchen!
Print
Skeleton Cookies with White Chocolate Icing Recipe
- Prep Time: 45 minutes
- Cook Time: 15 minutes
- Total Time: 1 hour 30 minutes
- Yield: 15 cookies
- Category: Dessert
- Method: Baking
- Cuisine: Western
Description
Delightfully rich and chocolatey skeleton cookies made with a tender cocoa shortbread base, finished with delicate white chocolate skeleton designs. Perfect for Halloween or any fun occasion, these cookies combine a melt-in-your-mouth texture with decorative flair.
Ingredients
Cookie Dough
- 160g salted butter, softened
- ½ cup icing sugar
- ½ cup cornflour
- ½ cup cocoa powder
- 1 cup plain flour
Decoration
- 100g white chocolate
Instructions
- Preheat Oven: Preheat your oven to 160°C fan bake to ensure an even and moderate baking environment for the delicate cookies.
- Prepare Butter and Sugar: Cut the softened butter into cubes and place them in the bowl of a mixer. Add the icing sugar and beat for several minutes until the mixture is pale and fluffy, indicating it’s properly aerated.
- Add Dry Ingredients: Sift together cornflour, cocoa, and plain flour, then add to the butter mixture. Mix on low speed until the dough begins to come together into a cohesive ball.
- Chill Dough: Roll the dough into a ball, wrap it tightly in cling film, and refrigerate for 30 minutes to firm up and make it easier to handle.
- Roll and Cut: Lightly flour a bench surface and roll the chilled dough out to a thickness of about 1cm. If edges appear crumbly, gently press them back together. Use large or small people-shaped cookie cutters to cut out the shapes.
- Transfer and Bake: Carefully place the cut cookies onto baking trays lined with baking paper. Bake in the preheated oven for around 15 minutes until the edges start to brown but the centers remain soft.
- Cool Cookies: Transfer baked cookies to a wire rack and allow them to cool completely to room temperature before decorating.
- Melt Chocolate: Melt the white chocolate gently until smooth but not too runny, then allow it to cool slightly to a pipeable consistency.
- Pipe Skeleton Designs: Place the melted white chocolate into a snap lock bag, snip off a small corner, and carefully pipe skeleton shapes onto each cooled cookie as desired.
- Set and Store: Allow the chocolate skeletons to firm up fully before serving. Store finished cookies in an airtight container to maintain freshness.
Notes
- These cookies are chocolate-flavored shortbread that stay soft and lightly crumbly, perfect as a base for detailed white chocolate decorations.
- Ensure the dough is well chilled before rolling to prevent cracking and aid in clean cookie cutting.
- Use a piping bag or a plastic bag with a small corner cut for precise decorating with melted chocolate.
- Store in an airtight container to keep the decorations intact and the cookies fresh.
- For a darker chocolate flavor, you can adjust the cocoa content slightly, but maintain the balance for proper texture.
Nutrition
- Serving Size: 1 cookie
- Calories: 168
- Sugar: 8g
- Sodium: 75mg
- Fat: 11g
- Saturated Fat: 7g
- Unsaturated Fat: 3g
- Trans Fat: 0g
- Carbohydrates: 16g
- Fiber: 1g
- Protein: 2g
- Cholesterol: 24mg


