

If you’re looking for a fun, festive treat that’s perfect for fall — and especially Halloween — you’ve got to try this Rice Krispie Pumpkins Recipe. I absolutely love how these little pumpkins come together so easily, and trust me, they’re a huge hit with kids and adults alike. Not only are they adorable, but the surprise candy center makes them extra special. Stick around and I’ll walk you through everything you need to know to make these perfect pumpkin-shaped Rice Krispie treats that will have everyone asking for seconds.
Why You’ll Love This Recipe
- Easy to Make: You only need a few basic ingredients and simple steps to create these festive treats.
- Kid-Approved: My kids go crazy for them—especially the candy surprise hidden inside.
- Perfect for Parties: These pumpkins make adorable, handheld treats for Halloween gatherings or fall celebrations.
- Customizable: You can swap the candy centers or adjust the frosting colors for your own creative spin.

Ingredients You’ll Need
All of these ingredients work in harmony to make your Rice Krispie Pumpkins both delicious and visually festive. Plus, you probably already have most of them in your pantry or fridge, which makes this recipe even better for last-minute treats.
- Butter: Adds richness and helps melt the marshmallows smoothly; I recommend salted unless you’re watching sodium.
- Mini marshmallows: These melt down perfectly to bind the cereal, and we’re reserving a few for pumpkin stems!
- Rice crispy cereal: The classic base that gives that perfect crunch and familiar flavor.
- Orange and green liquid food coloring: Bring your pumpkins to life with vibrant autumn colors—orange for the pumpkin body, green for the stems and vines.
- Fun-sized candy pieces: This is the magic center! Pick your favorites like chocolate kisses, Snickers, or peanut butter cups to surprise everyone.
- Small Batch Buttercream Frosting: Used to create stems and decorate vines—feel free to make your own or pick up a store-bought version and tint it green.
Variations
I love encouraging you to make this Rice Krispie Pumpkins Recipe your own! I’ve played around with a few twists depending on what I have on hand or the occasion, so don’t be afraid to get creative.
- Nut-Free Version: Use nut-free candy centers or skip candy altogether and just shape the pumpkins plain—still just as fun!
- Spiced-Up: Add a dash of pumpkin pie spice to the melted marshmallows for an autumn-inspired flavor boost.
- Vegan Option: Try vegan marshmallows and a plant-based butter substitute for dairy-free pumpkins that still taste amazing.
- Color Variations: Use different food coloring combos to make white, green, or even purple pumpkins for unique fall displays.
How to Make Rice Krispie Pumpkins Recipe
Step 1: Melt Butter and Marshmallows Gently
Start by placing 2 tablespoons of butter in a Dutch oven or a wide pot over low heat. If you’re using unsalted butter, add 1/4 teaspoon salt to help enhance flavors. Once the butter is melted, toss in your 5 ounces of mini marshmallows. Stir continuously with a wooden spoon until about 90% of the marshmallows have melted. This trick helps prevent burning or ending up with rock-hard treats—patience here is key!
Step 2: Add Color and Cereal
Turn off the heat and add orange liquid food coloring directly to the melted marshmallow mixture—don’t be shy, your pumpkins should have a nice vibrant hue. Now, add your 3 cups of rice crispy cereal and fold everything together until every bit is coated. It’s messy but oh so satisfying!
Step 3: Shape Around Candy Centers
Using a 1/2 cup measuring cup, scoop out the mixture and mold it around one fun-sized candy piece, forming a ball. If the sticky mixture is clinging too much to your hands, grab a piece of greased parchment paper—which I found works wonders to keep things neat. Repeat this with all remaining cereal mixture and candies, and you’ll have your pumpkin shapes ready to decorate.
Step 4: Make and Attach Pumpkin Stems
Add green food coloring to your small batch of buttercream frosting and gently fold in the reserved 8 mini marshmallows until everything is well coated. These mini marshmallows become adorable little stems you’ll stick to the top of each pumpkin. Don’t stop there—transfer the rest of the frosting into a piping bag to pipe whimsical vines around your pumpkins. It really brings the whole look together and is so fun to do!
Pro Tips for Making Rice Krispie Pumpkins Recipe
- Don’t Rush Melting: Low heat and slow stirring ensure marshmallows melt smoothly without scorching.
- Grease Hands or Tools: Sticky Rice Krispies are much easier to handle when your hands or utensils are lightly greased.
- Use Fun-Sized Candy: They fit perfectly inside the pumpkins, giving a delightful surprise without overpowering the treat.
- Frosting Consistency: If your buttercream is too stiff, a tiny splash of milk makes piping vines a breeze.
How to Serve Rice Krispie Pumpkins Recipe

Garnishes
I usually keep it simple with green buttercream pumpkin stems and vines, but you can add sprinkles or edible glitter to jazz them up for a party. Plus, placing a little candy leaf or edible flower near the stem adds a cute touch if you want to impress guests even more.
Side Dishes
Since these are sweet and rich, I like pairing Rice Krispie Pumpkins with fresh fruit or a light beverage like apple cider. They also go surprisingly well alongside a simple cheese platter for a balanced fall dessert spread.
Creative Ways to Present
For Halloween parties, I’ve arranged these pumpkins in a rustic wooden crate lined with straw or shredded paper to look like a mini pumpkin patch. You can also tie little raffia ribbons around the stems or place them inside clear treat bags with a cute tag for giveaways.
Make Ahead and Storage
Storing Leftovers
I recommend keeping Rice Krispie Pumpkins in an airtight container at room temperature for up to 3 days. My experience is they stay nice and soft but don’t last nearly as long as regular Rice Krispie treats because of the frosting and candy.
Freezing
If you want to freeze extras, wrap each pumpkin tightly in plastic wrap and place them in a freezer-safe bag. They’ll keep for a couple of months, but you might lose some of their freshness and frosting texture when thawed.
Reheating
Reheating isn’t usually necessary, but if you want that just-made softness, pop the frozen pumpkins in the microwave for 10 seconds wrapped in a paper towel. Just be careful not to melt the candy centers!
FAQs
-
Can I use regular marshmallows instead of mini marshmallows?
Absolutely! You can use regular marshmallows, but you may need to slightly adjust the melting time since they are larger. Mini marshmallows melt more evenly and quickly, which is why I prefer them for this recipe.
-
What if I don’t have food coloring?
If you don’t have food coloring, the treats will still taste great but won’t have the signature pumpkin look. Natural alternatives like pumpkin spice or turmeric can add a hint of color and flavor, but liquid colorings really give that festive pop.
-
Can I make this recipe gluten-free?
Yes! Just make sure to use gluten-free rice crispy cereal to keep it safe for gluten sensitivities. Most brands have a certified gluten-free option.
-
How do I prevent the marshmallows from hardening?
Don’t overcook the marshmallows on the stove. Remove them from heat once they’re mostly melted but still soft and gooey. Overheating causes the marshmallow to harden once cooled, making the treats tough to chew.
Final Thoughts
This Rice Krispie Pumpkins Recipe has become my go-to for festive treats that bring so much joy with minimal fuss. I remember the first time I made these for a Halloween party—everyone was enchanted by the hidden candy surprise and the cute little pumpkin shapes. It’s such a fun recipe to make with kids, too, creating memories well beyond just a delicious snack. I really hope you enjoy making these as much as I do, and that they become a beloved tradition in your kitchen!
Print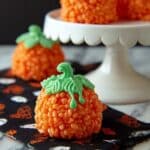
Rice Krispie Pumpkins Recipe
- Prep Time: 30 minutes
- Cook Time: 10 minutes
- Total Time: 40 minutes
- Yield: 8 pumpkin treats
- Category: Dessert
- Method: Stovetop
- Cuisine: American
- Diet: Vegetarian
Description
These Rice Krispie Pumpkins are festive, kid-friendly Halloween treats made by molding classic rice krispie cereal treats around fun-sized candy centers. Enhanced with vibrant orange and green food coloring and topped with mini marshmallow stems and piped buttercream vines, they are perfect for seasonal celebrations and easy to make with a simple stovetop method.
Ingredients
Rice Krispie Pumpkin Treats
- 2 tablespoons butter (add 1/4 teaspoon salt if using unsalted butter)
- 5 ounces mini marshmallows (about 3 cups), plus 8 mini marshmallows reserved for stems
- 3 cups Rice Krispie cereal
- Orange liquid food coloring
- Green liquid food coloring
- 8 fun-sized candy pieces (such as chocolate kisses, peanut butter cups, Snickers, or Milky Way), unwrapped
Small Batch Buttercream Frosting
- 1 recipe Small Batch Buttercream Frosting (ingredients according to your favorite recipe, typically includes butter, powdered sugar, vanilla, milk or cream)
Instructions
- Melt Butter and Marshmallows: In a Dutch oven or large wide pot over low heat, melt the butter. If using unsalted butter, add 1/4 teaspoon salt. Once melted, add the mini marshmallows and stir continuously with a wooden spoon until about 90% of the marshmallows are melted but not overcooked, to keep the treats soft.
- Add Food Coloring and Cereal: Turn off the heat and stir in orange food coloring thoroughly. Then fold in the Rice Krispie cereal until it is completely coated with the melted marshmallow mixture.
- Form Pumpkin Balls: Using a 1/2 cup measuring cup, scoop out portions of the cereal mixture. Shape each scoop around one fun-sized candy piece into a ball. If the mixture sticks to your hands, use greased parchment paper to handle and shape it more easily. Repeat until all cereal mixture and candies are used.
- Prepare Green Buttercream and Attach Stems: Add green food coloring to the buttercream frosting. Fold in the reserved mini marshmallows until they are coated with the green frosting. Attach one mini marshmallow stem to the top of each pumpkin treat.
- Pipe Vines: Transfer the remaining green buttercream into a piping bag and pipe curly vines onto the pumpkins for an authentic pumpkin look.
- Serve and Store: Serve immediately for best texture and flavor. You can store the treats in an airtight container at room temperature for up to 3 days.
Notes
- Rice Krispie Pumpkins are a fun and easy Halloween treat perfect for children and festive parties.
- Be careful not to overheat the marshmallows, or the treats may harden instead of staying soft and chewy.
- Use greased parchment paper or buttered hands to prevent sticking when shaping the pumpkin balls.
- These treats are best eaten the day they are made but will keep fresh for a few days if stored in an airtight container.
- You can customize the candy filling based on your favorite chocolates or treats for added surprise inside.
Nutrition
- Serving Size: 1 pumpkin treat
- Calories: 210
- Sugar: 20g
- Sodium: 120mg
- Fat: 7g
- Saturated Fat: 4g
- Unsaturated Fat: 2.5g
- Trans Fat: 0g
- Carbohydrates: 33g
- Fiber: 0.5g
- Protein: 2g
- Cholesterol: 15mg


