
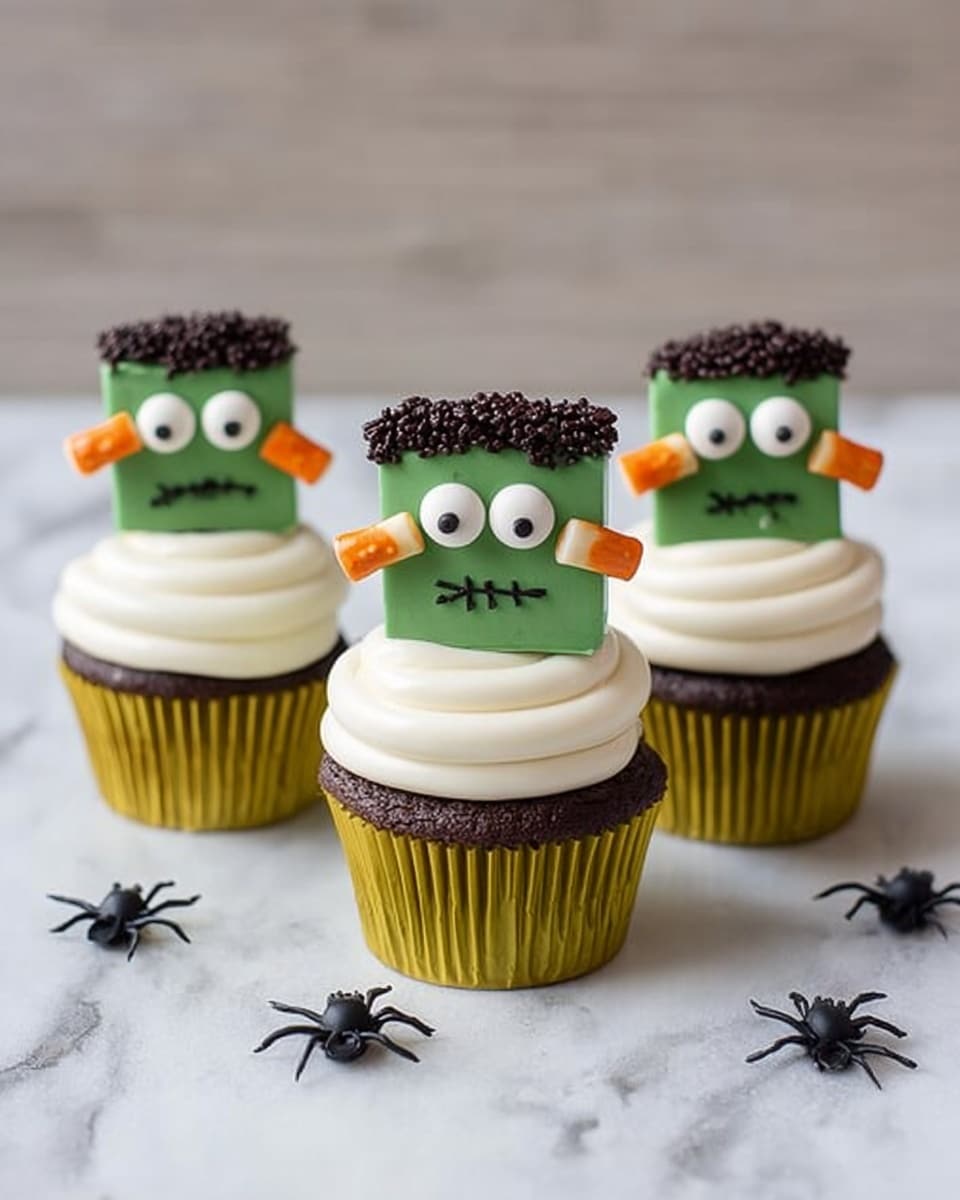
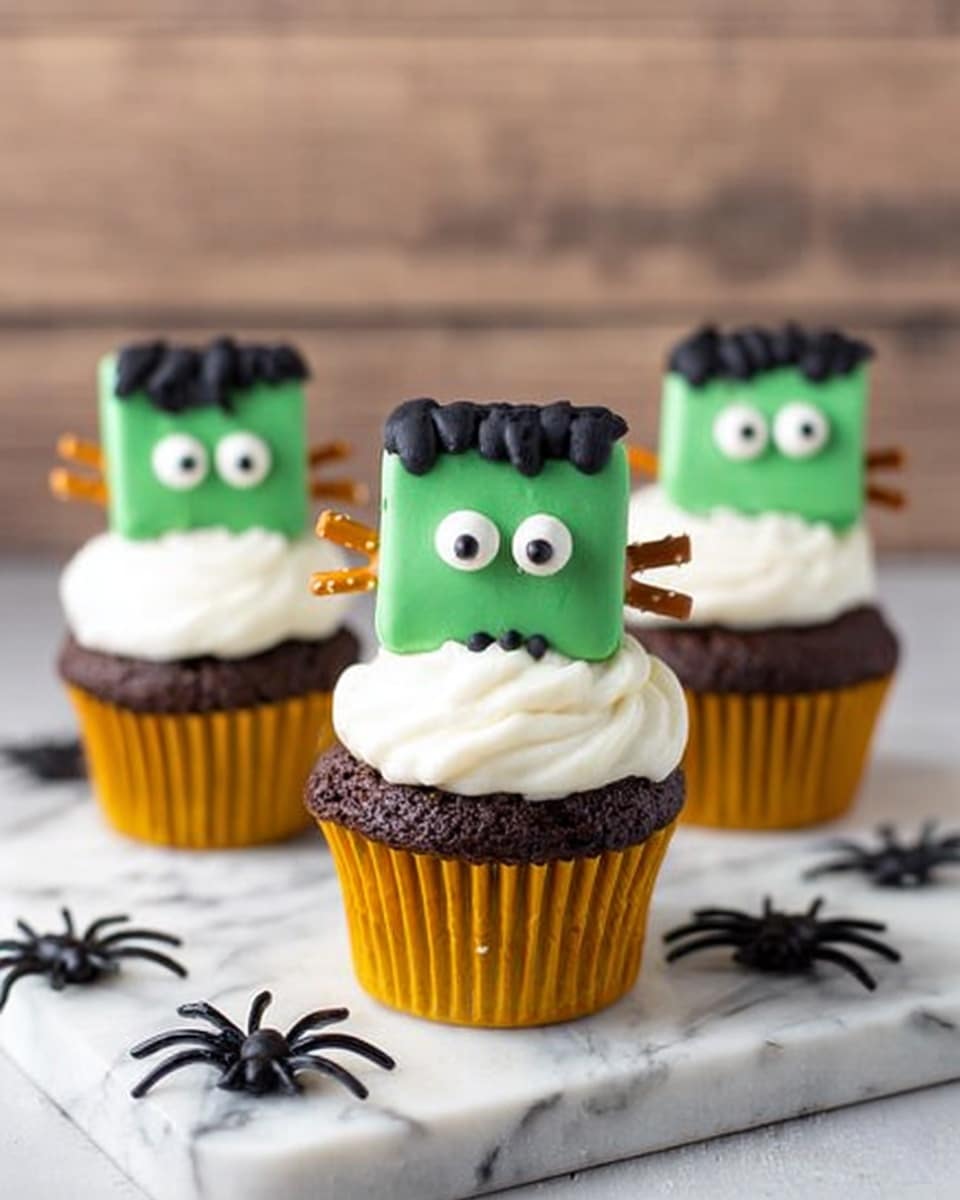
If you’re on the hunt for a Halloween treat that’s as adorable as it is delicious, you’re going to love this Frankenstein Cupcakes for Halloween Recipe. I absolutely love how these spooky cupcakes turn out—moist chocolate bases with creamy buttercream topped with cutest Frankenstein marshmallow heads. Whether you’re baking for kids, a party, or just to satisfy your sweet tooth, this recipe is fan-freaking-tastic and surprisingly easy to pull off. Stick with me, and I’ll walk you through every step so your Halloween dessert is a total hit!
Why You’ll Love This Recipe
- Fun and Festive: These cupcakes bring the Halloween spirit to life with adorable Frankenstein faces made from marshmallows and candy melts.
- Easy to Follow: The step-by-step instructions make this recipe approachable even if you’re a baking beginner.
- Rich, Moist Flavor: The chocolate cupcake base is perfectly balanced, thanks to the cocoa powder and a hint of hot chocolate.
- Customizable Decorations: You can easily switch up colors or candies to match your unique Halloween vibe.

Ingredients You’ll Need
The magic of this Frankenstein Cupcakes for Halloween Recipe lies in simple yet rich ingredients that play so well together. From the fluffy chocolate cupcake to the creamy buttercream and sweet green candy-coated marshmallow heads, each item serves a purpose. When shopping, quality cocoa powder and fresh eggs make a noticeable difference!
- All-Purpose Flour: The backbone of your cupcake structure; make sure to spoon and level for accuracy.
- Cocoa Powder: Gives the chocolate depth—natural or Dutch-processed both work but affect color slightly.
- Baking Powder & Baking Soda: These leavening agents help your cupcakes rise perfectly fluffy.
- Salt: Just a pinch to enhance all the sweet flavors.
- Butter (Softened): Use unsalted and softened for a smooth batter and creamy frosting.
- Granulated Sugar: Sweetens up the cupcakes; make sure it’s fully mixed for even texture.
- Eggs (Large): Adds moisture and binds everything together nicely.
- Sour Cream: Keeps cupcakes tender and adds a slight tang.
- Hot Chocolate: A surprising twist that boosts chocolaty richness in the batter.
- Icing Sugar: Essential for a silky, sweet buttercream that’s easy to pipe.
- Milk: Adjusts the frosting consistency for smooth piping.
- Large Marshmallows: For making the cute Frankenstein heads—stick a toothpick in each before dipping.
- Green Candy Melts: These create the classic Frankenstein green color coating your marshmallow heads.
- Black Decorating Frosting: Perfect for drawing stitches, hair, and mouths.
- Mini Pretzels: Use as “bolts” on either side of Frankenstein’s head for that iconic look.
- Candy Googly Eyes: Add personality with these fun eyeballs.
Variations
One of the things I love most about this Frankenstein Cupcakes for Halloween Recipe is how easy it is to adjust based on your preferences or pantry. I like to add my little twists depending on the crowd I’m serving. Don’t be shy to make it your own!
- Gluten-Free Option: I once swapped in a gluten-free flour blend and was pleasantly surprised by how well the cupcakes rose and tasted.
- Vegan Version: Try plant-based butter and flax eggs to make these Halloween treats vegan-friendly without losing texture.
- Flavor Twists: Occasionally, I add a teaspoon of espresso powder to deepen the chocolate flavor or sprinkle in some cinnamon for a spicy note.
- Alternative Colors: Instead of green, I’ve used purple or orange candy melts for a fun spin that matches different Halloween themes.
How to Make Frankenstein Cupcakes for Halloween Recipe
Step 1: Mix the Dry Ingredients
Start by sifting together the all-purpose flour, cocoa powder, baking powder, baking soda, and a pinch of salt in a small bowl. Sifting ensures there are no lumps, which means your batter will be super smooth and the cupcakes will bake evenly. I like to set this aside while I prep the wet ingredients.
Step 2: Whisk the Wet Ingredients
In a separate bowl, whisk the softened butter with granulated sugar and eggs until creamy and well combined. Then fold in the sour cream—this keeps your cupcakes moist, which is key! The batter might look a little thick here, but that’s perfect.
Step 3: Combine Dry and Wet Ingredients
Add the sifted dry ingredients to the wet mixture in thirds. Mix gently but thoroughly after each addition to keep the batter light and airy. Once combined, stir in the hot chocolate—this little trick boosts the chocolate flavor while adding extra moisture. You’ll notice the batter becomes silky and decadent.
Step 4: Bake the Cupcakes
Divide the batter evenly into a lined or greased muffin pan, filling each cup about 2/3 full. This prevents overflow while allowing a nice rise. Bake in a preheated oven at the right temperature (usually around 350°F/175°C) for 15 to 17 minutes. Test doneness with a toothpick—it should come out clean or with just a few moist crumbs. Let cupcakes cool completely before decorating; trust me, this helps the frosting stick better.
Step 5: Prepare the Buttercream
For the luscious buttercream, beat the softened butter, icing sugar, and milk in a bowl. Start on low speed and gradually increase to high using an electric mixer. You want semi-stiff peaks that hold their shape without being too stiff to pipe. This buttercream is smooth and creamy, perfect for letting your Frankenstein decorations shine on top.
Step 6: Create Frankenstein Heads
Line a pan with wax paper, then insert a toothpick into the center of each large marshmallow (make sure it doesn’t poke through the bottom!). Melt the green candy melts in 30-second microwave intervals until smooth, then dip each marshmallow into the green coating and place them on the wax paper. While the candy is still tacky, add two candy eyes and small pretzel “bolts” on each side. Chill the marshmallows in the fridge for 15 to 20 minutes to let the green candy set.
Step 7: Decorate Your Cupcakes
Pipe the buttercream onto each cooled cupcake using a Wilton #10 tip, focusing a dollop in the center as a base for the marshmallow head. Using black decorating frosting and a Wilton tip #7, draw Frankenstein’s stitched mouth on each marshmallow head. Then, with tip #233, add his signature hair for that classic look. Finally, place one decorated marshmallow head on each cupcake.
Pro Tips for Making Frankenstein Cupcakes for Halloween Recipe
- Don’t Skip Sifting: It keeps the dry ingredients lump-free and makes your cupcakes extra tender.
- Use Room Temperature Ingredients: Butter and eggs at room temp blend smoothly, preventing a gritty batter.
- Cooling is Crucial: Frosting melts if cupcakes are warm, so patience here pays off.
- Be Gentle with Marshmallows: Insert toothpicks carefully to avoid puncturing through, keeping the candy coating intact.
How to Serve Frankenstein Cupcakes for Halloween Recipe
Garnishes
I typically keep the garnishes true to the Frankenstein theme—green candy coating, candy eyes, and pretzel bolts. For extra fun, I sometimes sprinkle a little edible glitter or dust green edible powder to give them a subtle eerie glow. It’s a hit with kids and adults alike!
Side Dishes
These cupcakes shine as the star dessert, but I like pairing them with simple treats like caramel apples or a bowl of mixed nuts with a sprinkle of pumpkin pie spice. For drinks, a rich hot chocolate or spiced apple cider complements the chocolate flavors perfectly.
Creative Ways to Present
One Halloween, I arranged these cupcakes on a platter lined with black lace doilies and scattered plastic spiders for atmosphere. Another time, I used a cake stand surrounded by cauldron-shaped candles. You can even place cupcake wrappers with monster prints to amp up the fun presentation. The key is making it festive and playful—it amps up the excitement before the first bite!
Make Ahead and Storage
Storing Leftovers
After decorating, I store leftover Frankenstein cupcakes in an airtight container in the fridge. They stay fresh for up to 3 days, and the marshmallow heads hold up nicely if kept cool. Just be mindful of moisture—too humid, and the candy coating can get sticky.
Freezing
I’ve frozen undecorated cupcakes before with great success. Wrap them tightly in plastic wrap and place them in a freezer bag for up to 2 months. When you’re ready to serve, thaw at room temperature, then decorate with frosting and marshmallow heads fresh—this way the candies and frosting don’t suffer texture loss.
Reheating
Since these are best served at room temperature, I usually just bring refrigerated cupcakes out for about 20 minutes before serving. Avoid microwaving decorated cupcakes—it melts the frosting and decorations. If frozen, thaw fully before decorating to keep the texture just right.
FAQs
-
Can I make the Frankenstein Cupcakes for Halloween Recipe ahead of time?
Absolutely! You can bake the cupcakes up to two days ahead and store them in an airtight container. I recommend decorating them the day you plan to serve so the frosting and marshmallow heads stay fresh and vibrant.
-
What if I can’t find green candy melts?
If green candy melts aren’t available, you can use white candy melts dyed with green oil-based food coloring or melted green-colored white chocolate. Alternatively, try dipping marshmallows in colored sugar sprinkles for texture.
-
Can I substitute the sour cream?
Yes, you can substitute sour cream with Greek yogurt or buttermilk. Both provide the moisture and slight tang necessary to keep cupcakes tender.
-
Any tips for perfect marshmallow heads?
Insert the toothpick gently to avoid piercing through the other side, and chill the dipped marshmallows on wax paper to help candy melts set evenly. Refrigeration helps firm them up quickly, making decorating easier.
-
How do I avoid the buttercream from melting on warm cupcakes?
The key is to completely cool the cupcakes before frosting. Warm cupcakes cause frosting to melt and slide off. I usually cool them at room temperature for about an hour or pop them in the fridge briefly before frosting.
Final Thoughts
This Frankenstein Cupcakes for Halloween Recipe has become my go-to for festive fun every October. There’s something so satisfying about combining baking with creative decorating—and seeing the smiles when everyone picks up their spooky cupcake. I’m excited for you to try this recipe; I promise it’s as enjoyable to make as it is to eat. Grab your apron, get your candy eyes ready, and let’s have some monster-sized fun baking these!
Print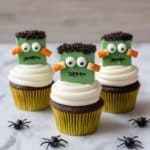
Frankenstein Cupcakes for Halloween Recipe
- Prep Time: 10 min
- Cook Time: 17 min
- Total Time: 27 min
- Yield: 12 cupcakes
- Category: Baking
- Method: Baking
- Cuisine: American
- Diet: Vegetarian
Description
Create spooky and delicious Frankenstein Cupcakes perfect for Halloween celebrations. These rich cocoa cupcakes are topped with creamy buttercream and adorned with fun marshmallow Frankenstein heads decorated with green candy melts, candy eyes, pretzels, and black frosting for a festive treat that kids and adults will love.
Ingredients
Cupcakes
- 1 Cup All-Purpose Flour
- ½ Cup Cocoa Powder
- ½ tsp Baking Powder
- ½ tsp Baking Soda
- Pinch Salt
- 6 tbsp Butter (Softened)
- 1 Cup Granulated Sugar
- 2 Large Eggs
- 1/3 Cup Sour Cream
- 1/3 Cup Hot Chocolate
Buttercream Frosting
- 1 Stick Butter (Softened)
- 2 Cups Icing Sugar
- 1-2 tbsp Milk
Decorations
- 12 Large Marshmallows
- 1 Cup Green Candy Melts
- Black Decorating Frosting
- Mini Pretzels
- 24 Candy Googly Eyes
Instructions
- Prepare Dry Ingredients: In a small bowl, sift together the all-purpose flour, cocoa powder, baking powder, baking soda, and a pinch of salt to ensure an even texture in the cupcake batter.
- Mix Wet Ingredients: In a separate larger bowl, whisk together the softened butter, granulated sugar, and eggs until creamy. Then, add the sour cream and fold gently into the mixture.
- Combine Batter: Gradually add the dry ingredients in thirds into the wet mixture, mixing thoroughly after each addition to fully incorporate all ingredients.
- Add Hot Chocolate: Pour in the hot chocolate into the batter and mix to combine, which will create a rich, chocolatey flavor.
- Fill Muffin Pan: Spoon the batter into each section of a muffin pan, filling about two-thirds full to allow room for rising while baking.
- Bake: Place the muffin pan in a preheated oven and bake for 15 to 17 minutes or until a toothpick inserted into the center comes out clean. Allow the cupcakes to cool completely before decorating.
- Make Buttercream: In a large bowl, add softened butter, icing sugar, and milk. Using an electric mixer, beat on low speed initially and gradually increase to high until the mixture is smooth and forms semi-stiff peaks, indicating the buttercream is ready.
- Frost Cupcakes: Transfer the buttercream into a piping bag fitted with a Wilton #10 tip. Pipe a swirl of frosting onto the center of each cooled cupcake.
- Prepare Marshmallow Heads: Line a pan with wax paper and set aside. Insert a toothpick into the center of each large marshmallow carefully so it doesn’t pierce through the other side.
- Melt Candy Melts: Place the green candy melts into a microwave-safe bowl and heat in 30-second intervals, stirring between, until fully melted.
- Coat Marshmallows: Dip each marshmallow into the melted green candy until fully covered, then place gently on the lined pan.
- Add Eyes and Pretzels: Stick two candy googly eyes on each coated marshmallow. Break pretzel sticks into small pieces and attach one piece on either side of the marshmallow’s head to resemble ears or bolts.
- Set Decorations: Refrigerate the marshmallow heads for 15 to 20 minutes to allow the candy coating to harden and set properly.
- Add Final Details: Using a piping bag fitted with Wilton tip #7, pipe black decorating frosting to create Frankenstein’s stitched mouth. Then, attach the marshmallow heads on top of each cupcake by pressing gently into the frosting.
- Decorate Hair: With another piping bag fitted with Wilton tip #233, pipe black frosting to mimic Frankenstein’s hair on each marshmallow head, adding character and detail.
- Serve: Present your Frankenstein cupcakes and enjoy the festive, spooky treat with your friends and family!
Notes
- This is a fun and easy tutorial for making Frankenstein-themed cupcakes, perfect for Halloween parties.
- Be sure to allow cupcakes to cool completely before frosting to prevent melting the buttercream.
- Use toothpicks carefully when inserting into marshmallows to avoid breaking them.
- If green candy melts are not available, white candy melts mixed with green food coloring can be used as an alternative.
- Store decorated cupcakes in a cool place or refrigerate but bring to room temperature before serving for best texture and flavor.
Nutrition
- Serving Size: 1 cupcake
- Calories: 340 kcal
- Sugar: 48 g
- Sodium: 143 mg
- Fat: 11 g
- Saturated Fat: 7 g
- Unsaturated Fat: 2.5 g
- Trans Fat: 0.3 g
- Carbohydrates: 60 g
- Fiber: 2 g
- Protein: 3 g
- Cholesterol: 47 mg


