
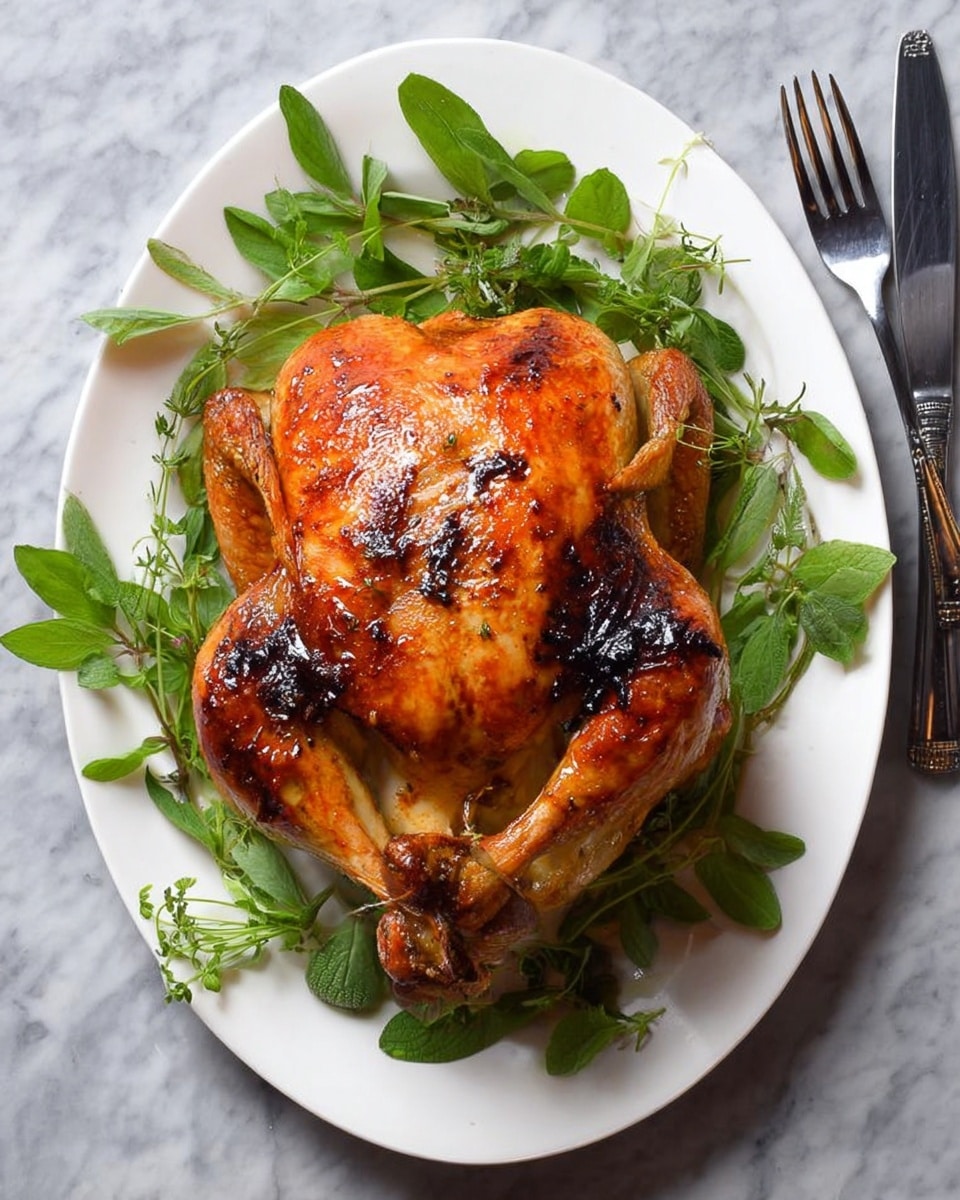
If you’ve been hunting for the ultimate **Dry Brine Turkey Recipe**, you’re in the right spot. I absolutely love how this method transforms a simple bird into the juiciest, most flavorful centerpiece—perfect for gatherings or a cozy family dinner. Trust me, once you try dry brining, you’ll never want to skip it again!
Why You’ll Love This Recipe
- Juicy and Flavorful: The dry brine penetrates deeply for incredible taste in every bite.
- Simpler Than Wet Brining: No big containers or extra water, just salt and spices doing their magic.
- Crisp Skin Every Time: Dry brining dries the skin so it roasts up beautifully crunchy.
- Stress-Free Timing: You can prep up to 48 hours ahead and just let the refrigerator do the work.

Ingredients You’ll Need
Each ingredient in this Dry Brine Turkey Recipe complements the others for a perfectly balanced bird. The blend of herbs and salt pulls moisture while adding subtle savory notes, and the butter ensures that golden, rich finish. I always suggest using fresh herbs if possible—they make a noticeable difference.
- Turkey: Choose a 12 to 14-pound bird that’s fresh and not pre-injected for best results.
- Light brown sugar: Adds just a touch of sweetness that balances the saltiness.
- Kosher salt: The key to any dry brine, it draws out moisture while seasoning deeply.
- Dried thyme: Offers an earthy, woodsy aroma that pairs perfectly with poultry.
- Dried sage leaves or ground sage: A classic poultry herb that gives the bird comforting warmth.
- Freshly ground black pepper: Adds slight heat and peppery brightness.
- Unsalted butter: At room temperature for easy spreading and a luxurious finish on the skin.
- Yellow onion: Cut into wedges to roast alongside and flavor the pan juices.
- Carrots: Chunky pieces bring sweetness and roast beautifully under the bird.
- Celery stalks: Add depth and classic flavor to the roasting pan.
Variations
I like to keep the dry brine simple because it lets the turkey shine, but you can absolutely tweak it to match your vibe or season. Feel free to experiment! The great thing about dry brining is it’s flexible and forgiving.
- Herb Variations: Sometimes I swap sage for rosemary or add a pinch of smoked paprika for a subtle smoky depth—my family loves the bonus flavor kick.
- Spice it Up: Adding crushed garlic or a bit of cayenne pepper to the brine gives the turkey a gentle warmth without overpowering.
- Diet-Friendly: Use coconut sugar in place of brown sugar and swap butter for ghee to make a Paleo-friendly dry brine turkey.
- Seasonal Touch: In fall, I’ll add dried cranberries into the roasting pan with the veggies, letting their tartness mingle into the drippings for a unique gravy flavor.
How to Make Dry Brine Turkey Recipe
Step 1: Prep Your Turkey with Love
First things first, remove the truss around the legs if it’s there—this lets the turkey cook nicely and evenly. Don’t forget to rinse your turkey inside and out with warm water, then pat it completely dry with paper towels. I know, rinsing is controversial—but for this recipe, I trust a quick warm rinse helps the dry brine soak in better. Just make sure to dry it really well afterward so the skin can crisp up beautifully.
Step 2: Mix and Apply the Dry Brine
Combine the light brown sugar, kosher salt, dried thyme, sage, and black pepper in a small bowl. This simple blend works magic by seasoning inside and out. Then, rub this mixture all over the turkey, making sure to get inside the cavity too. This is the heart of the Dry Brine Turkey Recipe. Pop your bird on a rack set inside a rimmed baking sheet and refrigerate uncovered for at least 24 hours—up to 48 if you’ve got the time. The air circulation here is crucial: it dries out the skin which equals golden crispiness when roasted.
Step 3: Get Your Oven Ready and Prep Veggies
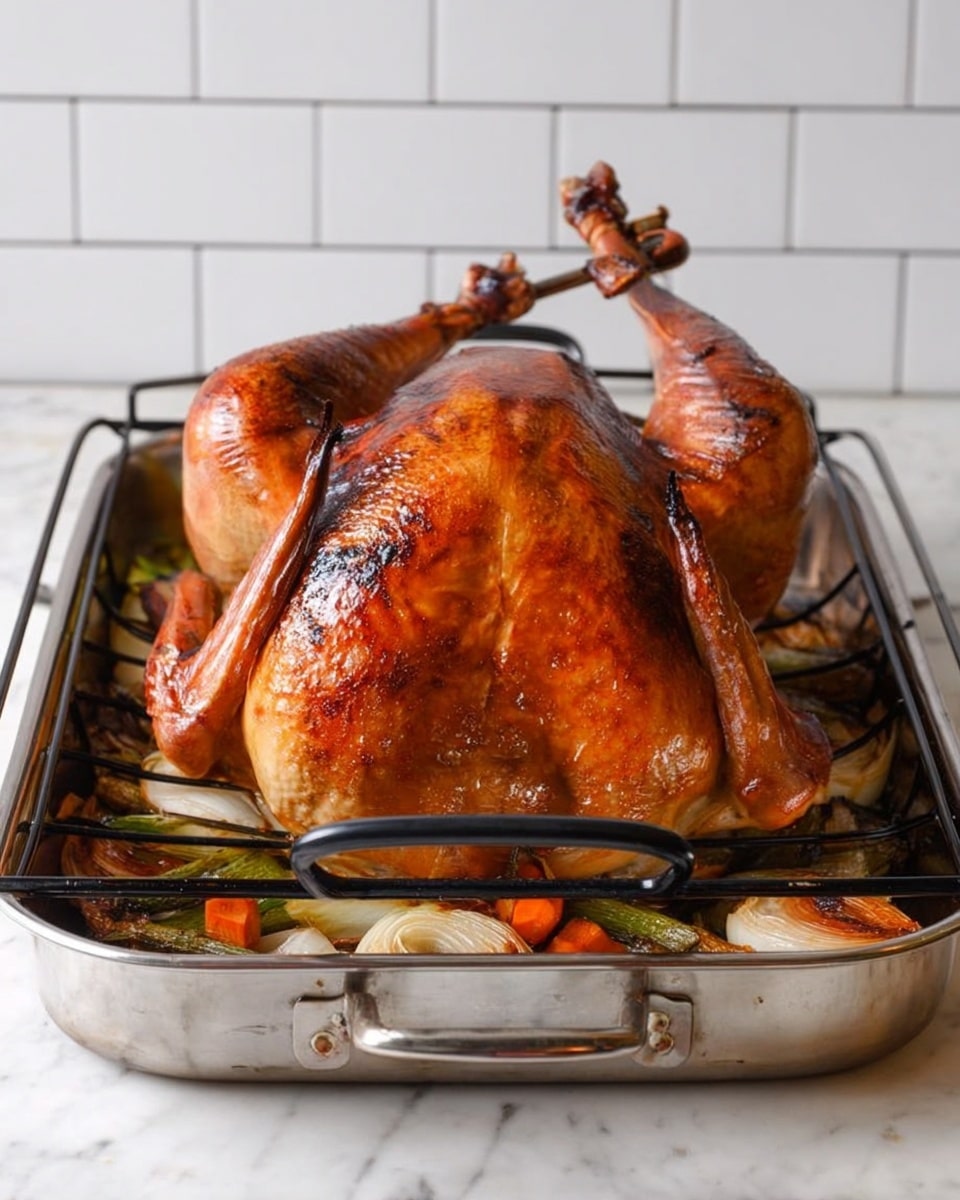
When you’re ready to roast, preheat your oven to 375°F and toss the onion wedges, carrots, and celery pieces into the bottom of a large roasting pan. This veggie bed flavors the drippings and helps the turkey cook evenly from underneath. Using a roasting rack keeps the turkey elevated so the heat surrounds it nicely—plus, juices drip down for gravy perfection.
Step 4: Brush, Roast, and Monitor
Brush off any excess dry brine from the outside of the turkey (but leave it inside the cavity—it adds wonderful flavor). Next, spread your softened butter all over the turkey. This seals in moisture and promotes browning. Roast the bird for about 1¾ to 2½ hours, depending on size. I always check at 1½ hours so I can tent with foil if the skin’s browning too fast—this tip really saved me from a burnt skin disaster more than once! Use a leave-in thermometer if you have one; the bird’s safely cooked when the breast and thigh reach 165°F.
Step 5: Rest and Serve with Gratitude
Resting is crucial (I used to rush this part and regret it). When your turkey’s done, carefully tilt it so the flavorful juices drain into the pan. Then transfer to a platter, tent with foil, and let it rest for 20 to 30 minutes. This lets the juices redistribute, keeping your bird tender and juicy. While it rests, I love to make a homemade gravy from those incredible pan drippings—you can find my go-to gravy recipe linked below. Finally, carve and get ready for all the compliments!
Pro Tips for Making Dry Brine Turkey Recipe
- Don’t Skip the Drying: Leaving your turkey uncovered in the fridge overnight is what makes the skin crispy—resist the urge to cover it early!
- Adjust Salt If Needed: If you use a self-basting or injected turkey, cut the kosher salt in half to avoid an overly salty bird.
- Low and Slow Wins: Roasting at 375°F gives a good balance between juicy meat and crispy skin; higher heat can dry out the bird.
- Use a Leave-In Thermometer: It’s a game-changer for monitoring doneness without opening the oven and losing heat.
How to Serve Dry Brine Turkey Recipe
Garnishes
I usually keep it simple with fresh rosemary sprigs and a few halved lemons arranged around the turkey. The citrus brightens and adds visual freshness. Sometimes, I roast extra garlic cloves alongside for that irresistible aroma and soft, spreadable bites.
Side Dishes
My go-tos are creamy mashed potatoes, honey-glazed carrots, and a tangy cranberry sauce. They create the perfect balance with the savory, juicy turkey. Plus, some buttery dinner rolls to soak up all the gravy are non-negotiable in my house.
Creative Ways to Present
For holidays, I like to stuff the turkey cavity with fresh herbs like thyme and sage, plus orange slices for a sweet aroma. Another favorite is arranging the carved slices on a large wooden board with seasonal fruits and nuts—makes for a stunning, rustic spread everyone can graze!
Make Ahead and Storage
Storing Leftovers
I always refrigerate leftovers within two hours, placing carved slices in an airtight container or neatly wrapped plate. Keeping gravy separate helps to refresh the turkey without turning it soggy. I’ve found this method keeps the meat flavorful for up to four days.
Freezing
If I want to save turkey longer, I freeze carved slices in freezer bags with a little of the leftover gravy to lock in moisture. When thawed slowly in the fridge overnight, it reheats beautifully without drying out.
Reheating
To reheat, I spread a thin layer of gravy over the turkey, cover with foil, and warm in a 325°F oven for about 20 to 30 minutes. This keeps the meat moist and prevents the edges from drying out—way better than a microwave in my experience.
FAQs
-
What is the difference between a dry brine turkey and a wet brine turkey?
A dry brine uses salt and seasonings rubbed directly onto the turkey skin without added water, which draws moisture out and then reabsorbs it, enhancing flavor and texture. Wet brining immerses the turkey in a saltwater solution, which can be messier and requires a large container. Dry brining simplifies the process while still delivering juicy, flavorful results.
-
How long should I dry brine my turkey?
I recommend dry brining your turkey for at least 24 hours and up to 48 hours for maximum flavor and the crispiest skin. If you’re short on time, 24 hours still makes a big difference compared to no brine at all.
-
Can I dry brine a frozen turkey?
It’s best to dry brine a fully thawed turkey to ensure the seasonings penetrate evenly. If your turkey is still partially frozen, thaw it completely in the fridge before starting the dry brine process.
-
Do I need to rinse the turkey after dry brining?
You don’t have to rinse the turkey after dry brining—just brush off the excess salt on the skin before roasting. However, for this recipe, I like to gently brush off just the exterior salt to avoid over-salting while keeping the flavorful brine inside the cavity.
-
What if I can only find a self-basting or injected turkey?
These turkeys have already been seasoned or brined, so use only half the amount of kosher salt in your dry brine to avoid oversalting. They’ll still benefit from the additional herbs and seasoning though!
Final Thoughts
This Dry Brine Turkey Recipe has honestly changed how I feel about cooking a turkey—it’s easier, tastier, and less intimidating than I ever imagined. If you’ve been nervous about tackling a big bird, I truly encourage you to give this a try. Nothing beats that moment when you slice into a perfectly juicy, flavorful turkey and hear your friends and family say, “Wow!” You’re gonna love it.
Print
Dry Brine Turkey Recipe
- Prep Time: 30 minutes
- Cook Time: 2 hours 30 minutes
- Total Time: 3 hours
- Yield: 8 servings
- Category: Main Dish
- Method: Roasting
- Cuisine: American
Description
This Dry Brine Turkey recipe delivers a perfectly juicy and flavorful bird, enhanced with a blend of brown sugar, kosher salt, and aromatic herbs. Dry brining the turkey for 24 to 48 hours ensures tender meat with crispy, golden skin. Roasted to perfection with a butter rub and fresh vegetables, this method is great for holiday meals and can be prepared in advance for convenience.
Ingredients
Turkey and Brine
- 1 (12 to 14-pound) turkey, patted dry
- ¼ cup packed light brown sugar
- 3 tablespoons Morton kosher salt (or ¼ cup Diamond kosher salt)
- 2 teaspoons dried thyme
- 2 teaspoons dried sage leaves or ground sage
- 1 teaspoon freshly ground black pepper
- 6 tablespoons unsalted butter, at room temperature
Vegetables for Roasting
- 1 large yellow onion, cut into wedges
- 2 carrots, cut into 2-inch pieces
- 2 stalks celery, cut into 2-inch pieces
Instructions
- Prepare the turkey: Line a rimmed baking sheet with aluminum foil and place an oven rack on top. Remove and discard the truss holding the legs, and trim any excess fat from the neck or body cavity. Remove giblets and neck; discard or save for stock. Rinse the turkey inside and out with warm water, then pat dry thoroughly with paper towels.
- Make and apply the dry brine: In a small bowl, combine brown sugar, kosher salt, thyme, sage, and black pepper. Place the turkey on the rack and rub the dry brine mixture all over the turkey, including inside the cavity. Refrigerate uncovered for at least 24 hours and up to 48 hours at 40°F or below. For longer brining, loosely cover for the initial part and uncover for the final 24 hours to dry the skin.
- Preheat oven and prepare for roasting: Preheat the oven to 375°F and position a rack in the lower third. Using damp paper towels, gently brush the dry brine off the turkey’s exterior, leaving the cavity seasonings intact. Scatter onion, carrots, and celery in a large roasting pan and place a roasting rack inside the pan.
- Butter the turkey and roast: Place the turkey on the roasting rack and tuck the wings underneath. Rub softened butter generously all over the turkey. Roast for 1¾ to 2½ hours until the skin is deep golden and a thermometer reads 165°F in the breast and thigh. Check after 1½ hours and tent with foil if the skin is browning too quickly.
- Rest and prepare for serving: Carefully tilt the turkey to drain any cavity juices into the roasting pan. Transfer the bird to a platter and tent with foil, letting it rest 20 to 30 minutes. Remove vegetables from the pan; discard or save for serving if still firm. Reserve pan drippings for gravy.
- Make the gravy and carve: While resting, prepare gravy using the reserved drippings. Carve the turkey and serve with gravy on the side.
- Optional make-ahead: The turkey can be roasted and carved ahead. Arrange carved slices on a thin layer of gravy in an ovenproof dish, cover, and refrigerate up to two days. Reheat covered at 325°F for 20 to 30 minutes before serving; reheat gravy separately.
Notes
- Use a non-kosher, non-injected, and non-self-basting turkey for best results. If using one that is kosher or injected, reduce the salt in the dry brine by half.
- For accurate cooking, use a digital leave-in thermometer with remote monitor to track internal temperature without opening the oven.
- Allowing the skin to dry uncovered in the fridge helps with a crispy skin texture after roasting.
- If the skin browns too quickly, tent loosely with aluminum foil to prevent burning.
- Resting the turkey before carving ensures juicy, tender meat.
- Vegetables used in roasting can be discarded or served if not overcooked.
Nutrition
- Serving Size: 1 serving (based on 8 servings from one 12-14 lb turkey)
- Calories: 1075
- Sugar: 5 g
- Sodium: 1619 mg
- Fat: 47 g
- Saturated Fat: 15 g
- Unsaturated Fat: 32 g
- Trans Fat: 0 g
- Carbohydrates: 6 g
- Fiber: 0 g
- Protein: 147 g
- Cholesterol: 513 mg


