
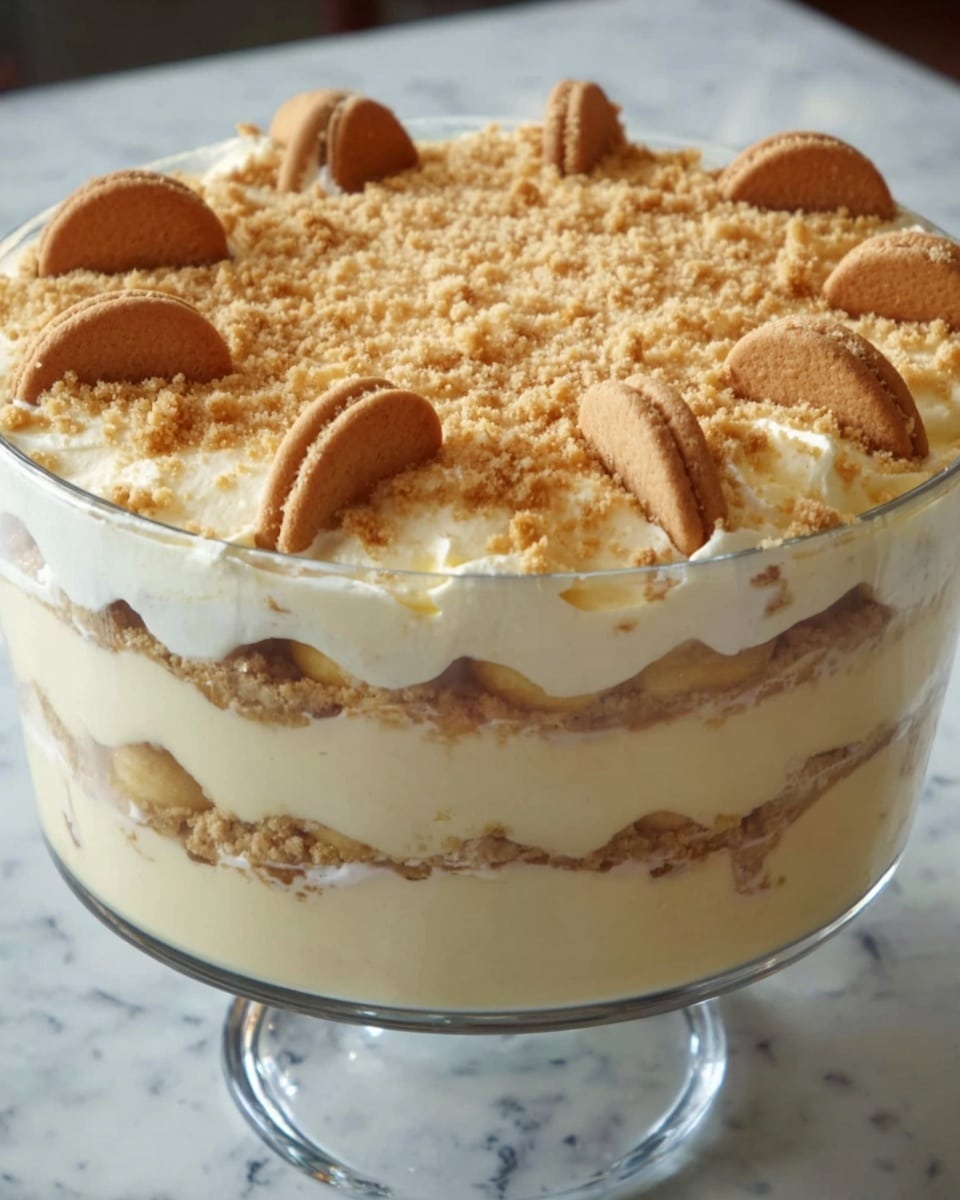
I absolutely love this Nilla Wafer Banana Pudding with Vanilla Bean and Homemade Whipped Cream Recipe because it takes a classic Southern dessert and gives it a truly next-level twist. The addition of real vanilla bean seeds makes the pudding luxuriously fragrant, while the homemade whipped cream adds the perfect creamy, light touch you just can’t get from store-bought toppings.
Whether you’re making this for a family dinner, a potluck, or just a sweet weekend treat, you’ll find that this recipe is super reliable and surprisingly easy. It’s one of those desserts where you can prep it ahead of time, pop it in the fridge overnight, and wow everyone the next day. Truly, a crowd-pleaser that’s both nostalgic and gourmet!
Why You’ll Love This Recipe
- Classic meets gourmet: The vanilla bean and homemade whipped cream elevate the nostalgic banana pudding into something special.
- Simple prep with big payoff: You only need basic ingredients but end up with a dessert that tastes sophisticated.
- Make-ahead friendly: Layers soften overnight for perfect texture without extra work before serving.
- Loved by everyone: My family goes crazy for this pudding every time it hits the table!

Ingredients You’ll Need
This Nilla Wafer Banana Pudding with Vanilla Bean and Homemade Whipped Cream Recipe is all about balancing rich, creamy textures with the freshness of bananas and the crunch of wafers. Choosing quality ingredients really makes a difference, especially those vanilla beans and fresh bananas!
- Eggs: They’re the secret to a silky, thick pudding base, so fresh eggs make a big difference.
- Granulated sugar: Provides that perfect sweetness and helps with the texture.
- All-purpose flour: Acts as a natural thickener for the pudding without any grit.
- Kosher salt: Just a pinch enhances all the flavors beautifully.
- Milk (preferably 2%): Using 2% milk keeps the pudding creamy but not too heavy—whole milk works too if you want it richer.
- Pure vanilla extract: Boosts the vanilla flavor alongside the vanilla bean seeds.
- Sweetened condensed milk: This adds lush sweetness and creaminess that’s just unbeatable.
- Heavy cream: Cold, to whip into a fluffy homemade whipped cream topping.
- Powdered sugar: Dust it into the whipped cream for a silky texture without any graininess.
- Vanilla bean pods: Split and scraped for those little black seeds that infuse the pudding with authentic vanilla aroma.
- Nilla Wafers: The classic crunchy base that soaks up the pudding perfectly without falling apart too quickly.
- Bananas: Fresh and sliced about 1/4 inch thick to add that natural sweetness and texture contrast.
Variations
I love how flexible this Nilla Wafer Banana Pudding with Vanilla Bean and Homemade Whipped Cream Recipe is—you can easily make it your own by swapping in some personal favorites or adapting to dietary needs.
- Use coconut milk: When I first wanted a dairy-free version, swapping regular milk for coconut milk gave it a subtle tropical twist I enjoyed.
- Chocolate chips: Adding a handful between the layers can give a fun chocolate-banana combo that my kids adore.
- Caramel drizzle: For parties, I’ll sometimes drizzle homemade caramel sauce on top for extra indulgence.
- Gluten-free wafers: If you’re avoiding gluten, I’ve found great gluten-free vanilla wafers that work perfectly in place of Nilla Wafers.
How to Make Nilla Wafer Banana Pudding with Vanilla Bean and Homemade Whipped Cream Recipe
Step 1: Whisk the eggs and prepare the pudding base
Start by whisking the eggs in a medium bowl until smooth—that’s going to build the rich custard texture we want. In a large saucepan over medium heat, mix together the sugar, flour, and salt, then whisk in the milk. Cook this mixture, stirring occasionally, until you see it start to thicken and bubble, about 5-7 minutes. Once bubbly, turn the heat low and cook for an additional two minutes to make sure it’s thick enough.
Step 2: Temper the eggs and finish the pudding
This part requires some gentle care: slowly ladle a bit of your hot milk mixture into the eggs, whisking constantly to avoid scrambling. Then pour the egg mixture back into the pan and whisk continuously over low heat until it reaches a gentle boil again. Cook for 2 extra minutes while stirring—it should be luscious and thick now. Remove from the heat and stir in your vanilla extract. Let it cool for about 15 minutes, stirring now and then.
Step 3: Fold in the sweetened condensed milk and cool completely
Once the pudding has cooled a bit, fold in the sweetened condensed milk for extra smoothness and sweetness. Keep letting the pudding cool to room temperature—this step ensures everything combines beautifully without melting the whipped cream later.
Step 4: Make the homemade whipped cream
In the bowl of a stand mixer fitted with a whisk attachment, whip together the cold heavy cream, powdered sugar, and those gorgeous vanilla bean seeds on high speed until stiff peaks form. I love when those tiny vanilla seeds are visible; they make the cream smell incredible!
Step 5: Assemble the layers and chill overnight
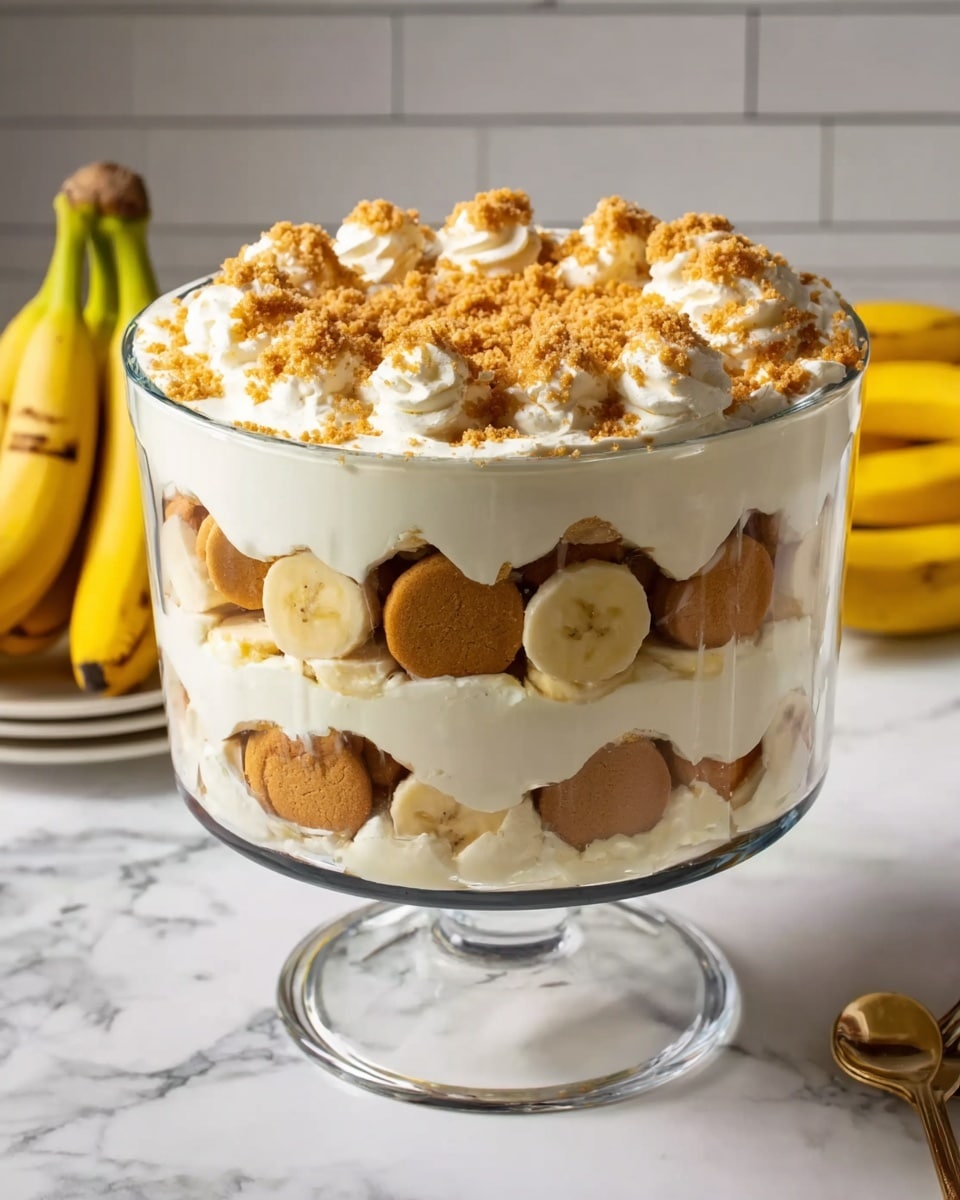
Gently fold the whipped cream into the cooled pudding in two portions—this keeps the texture nice and fluffy. In a large trifle dish, start layering: a layer of Nilla Wafers, then banana slices, followed by the pudding mixture. Repeat, saving some wafers to crush on top for a pretty finish. Cover the dish tightly with plastic wrap and refrigerate overnight so the wafers soften just right and all those flavors meld together.
Pro Tips for Making Nilla Wafer Banana Pudding with Vanilla Bean and Homemade Whipped Cream Recipe
- Temper your eggs carefully: Adding hot milk slowly while whisking prevents scrambled eggs and keeps the pudding silky.
- Use cold heavy cream: Chilled cream whips better and tastes fresher in your homemade whipped topping.
- Layer in a large clear dish: This helps you show off your beautiful layers—plus, it’s easier to serve.
- Don’t skip the chill time: Refrigerating overnight allows wafers to soften without becoming mushy, giving the perfect texture.
How to Serve Nilla Wafer Banana Pudding with Vanilla Bean and Homemade Whipped Cream Recipe
Garnishes
I like to finish mine with a generous sprinkle of crushed Nilla Wafers for crunch, plus a few banana slices on top for freshness and color. You could even add a light dusting of ground cinnamon or toasted coconut flakes if you want to jazz things up visually and flavor-wise.
Side Dishes
Because this pudding is such a rich dessert, I usually pair it with light, fresh salads or simple grilled chicken for a balanced meal. For potlucks, it’s wonderful on its own as the star dessert after a heavier main course.
Creative Ways to Present
For special occasions, I’ve layered this pudding into individual glasses for charming single servings that look elegant on a dessert table. You can also top with edible flowers or fresh mint sprigs for a pop of color and sophistication.
Make Ahead and Storage
Storing Leftovers
After serving, cover the pudding tightly with plastic wrap and keep it refrigerated. My experience is that it holds nicely for 2-3 days, though the wafers will continue to soften, so it’s best enjoyed sooner rather than later.
Freezing
I don’t usually freeze this pudding because the texture of the bananas and wafers changes after thawing, but if you do, separate into airtight containers and freeze for up to a month. Thaw overnight in the fridge before serving.
Reheating
Because this is served cold, reheating isn’t necessary. If you prefer it slightly warmer, let it sit at room temperature for 15-20 minutes, but be careful—warming too much changes the texture.
FAQs
-
Can I make this Nilla Wafer Banana Pudding with Vanilla Bean and Homemade Whipped Cream Recipe dairy-free?
Absolutely! Substitute the milk with your favorite plant-based milk (like almond or coconut milk) and use a dairy-free whipped topping or coconut cream whipped at home. Just keep in mind that the flavor and texture will vary slightly from the original.
-
How long can I store leftover banana pudding?
Once refrigerated, banana pudding is best enjoyed within 2 to 3 days. After that, the bananas may brown and the texture may change, so fresh is always best!
-
Can I use instant pudding mix instead?
You can, but this homemade version with vanilla bean and fresh ingredients tastes so much better. Instant pudding tends to be less rich and can have a chalkier texture, so I recommend sticking with this recipe for the best flavor and creaminess.
-
What if my pudding is too runny?
Make sure you cook the pudding long enough to thicken properly. If it’s still runny, simmer it a little longer while stirring, and be sure to measure flour correctly—too little flour affects thickening.
Final Thoughts
This Nilla Wafer Banana Pudding with Vanilla Bean and Homemade Whipped Cream Recipe holds a special place in my heart—it reminds me of that comforting, homey feeling of family dinners and sharing something sweet with loved ones. If you’re looking to make a dessert that’s easy to prepare but makes a big impression, this is your go-to. Give it a try; I promise you’ll be so glad you did, and your family or friends will be coming back for seconds, just like mine always do.
Print
Nilla Wafer Banana Pudding with Vanilla Bean and Homemade Whipped Cream Recipe
- Prep Time: 20 mins
- Cook Time: 15 mins
- Total Time: 1 hr 30 mins
- Yield: 8-10 servings
- Category: Dessert
- Method: Stovetop
- Cuisine: American
- Diet: Vegetarian
Description
This Nilla Wafer Banana Pudding is a rich, creamy dessert featuring layers of delicate homemade vanilla pudding, ripe banana slices, and crunchy Nilla Wafers. The pudding is made from scratch with eggs, milk, and sweetened condensed milk for depth of flavor, folded with freshly whipped cream infused with real vanilla bean seeds. Chilled overnight, this nostalgic classic is elevated to a gourmet treat perfect for gatherings or comforting at home.
Ingredients
Pudding Ingredients
- 3 large eggs
- 3/4 cup granulated sugar
- 1/4 cup all-purpose flour
- 1/4 teaspoon kosher salt
- 3 cups milk (preferably 2%)
- 1 teaspoon pure vanilla extract
- 1 (14-ounce) can sweetened condensed milk
Whipped Cream
- 1 1/3 cups cold heavy cream
- 6 tablespoons powdered sugar
- Seeds from 2 vanilla bean pods, split and scraped
Assembly
- 1 (8-ounce) box Nilla Wafers
- 4 large bananas, sliced into 1/4-inch rounds
Instructions
- Make pudding: In a medium bowl, whisk the eggs until smooth. In a large saucepan over medium heat, whisk together sugar, flour, and kosher salt. Gradually add the milk while whisking to combine everything smoothly. Cook the mixture, stirring occasionally, until it thickens and begins to bubble. Reduce heat to low and continue cooking for 2 more minutes to fully activate the thickening.
- Temper eggs: Remove the pan from heat. Slowly pour about a cup of the hot milk mixture into the eggs, whisking vigorously to prevent the eggs from scrambling. Then pour the egg mixture back into the saucepan, stirring constantly.
- Finish pudding: Return the saucepan to medium heat and bring the mixture back to a gentle boil. Reduce heat to low and cook while stirring for an additional 2 minutes until pudding is thick and smooth. Remove from heat and stir in vanilla extract. Let the pudding cool for 15 minutes, stirring occasionally to prevent skin forming.
- Add sweetened condensed milk: Gently fold in the sweetened condensed milk into the pudding. Continue cooling the pudding to room temperature to prepare for assembly.
- Make whipped cream: In a stand mixer bowl fitted with a whisk attachment, combine cold heavy cream, powdered sugar, and the scraped vanilla bean seeds. Beat on high speed until stiff peaks form.
- Combine pudding and whipped cream: Gently fold the whipped cream into the cooled pudding in two additions, ensuring a light, airy texture is maintained.
- Assemble the pudding: In a large trifle dish or glass serving bowl, layer Nilla Wafers (reserving some for topping), sliced bananas, and the pudding mixture. Repeat layers to fill the dish.
- Chill and serve: Cover the assembled pudding with plastic wrap and refrigerate overnight to allow flavors to meld and wafers to soften. Just before serving, crush more Nilla Wafers on top as a crunchy garnish.
Notes
- This homemade banana pudding recipe offers a gourmet twist on a nostalgic childhood favorite, elevating it with fresh vanilla bean seeds and rich whipped cream.
- Chilling overnight is crucial for the pudding to set properly and for the flavors to fully develop.
- Use ripe but firm bananas to prevent overly mushy layers in the pudding.
- For a lighter version, you can substitute half-and-half for the heavy cream, but whipped cream might be less stable.
- If you don’t have vanilla bean pods, extra vanilla extract can be used, though it won’t have the same aromatic depth.
Nutrition
- Serving Size: 1 cup (approximate)
- Calories: 350
- Sugar: 33g
- Sodium: 120mg
- Fat: 18g
- Saturated Fat: 11g
- Unsaturated Fat: 6g
- Trans Fat: 0g
- Carbohydrates: 42g
- Fiber: 2g
- Protein: 6g
- Cholesterol: 125mg


