
If you’re craving a holiday treat that’s as adorable as it is delicious, you’ve got to try this Reese’s Trees Recipe. I absolutely love how simple it is to put together, yet it looks like you spent hours decorating. When I first made these Reese’s Trees, my family went crazy for them—they’re the perfect mix of chocolatey goodness and festive fun. Stick around, and I promise you’ll have your own adorable edible trees in no time!
Why You’ll Love This Recipe
- Easy to Make: No baking required—just a little assembly and decorating, perfect for last-minute holiday fun.
- Kid-Friendly: My kids love helping with the decorating, making this a family activity we all enjoy.
- Festive & Cute: These mini Reese’s trees look gorgeous on any holiday dessert table.
- Delicious Flavor Combo: The mix of Reese’s peanut butter cups with chocolate and sprinkles is pure holiday magic.

Ingredients You’ll Need
The beauty of the Reese’s Trees Recipe is how a few simple ingredients come together to create something truly special. You’ll find that the classic Reese’s flavors shine when paired with just a touch of frosting and sprinkles, so it’s worth using good quality candy and icing.
- Chocolate chips: Melt these to glue the pieces together—use semi-sweet or milk chocolate based on your sweetness preference.
- Mini Reese’s cups: These little cups form the top and bottom layers of your tree, so fresh ones make a difference.
- Regular Reese’s cups: The base of the tree, providing the perfect peanut butter and chocolate combo.
- Hershey’s kisses: The perfect peak for the tree—the classic chocolate kissed with a little sparkle.
- White and green decorating icing: Use these to pipe garlands and add festive touches to your trees.
- Sprinkles and gold stars: These add texture and holiday sparkle; don’t be shy to pile them on.
- Confectioners’ sugar (optional): Dusted over the finished trees, it creates a snowy effect that’s just magical.
Variations
I love how adaptable the Reese’s Trees Recipe is, and I encourage you to put your own twist on it! Whether you want to make it nut-free or add some festive flavors, it’s all about making the treat your own.
- Nut-Free Version: Swap peanut butter cups for nut-free chocolate candies—my niece is allergic, and we still get all the fun without the risk.
- Colored Icing: Try red and green icing instead of white and green—it makes the trees pop and really catches the kids’ eyes.
- Holiday Themes: Use themed sprinkles like snowflakes or red berries to match different holiday vibes. One year I did a “Winter Wonderland” set with extra snow dusting, and it was a hit!
- Size Variations: Make mini versions using smaller candies for bite-sized treats—great for party trays or classroom snacks.
How to Make Reese’s Trees Recipe
Step 1: Prep Your Chocolate Glue
Start by melting your chocolate chips gently—either in the microwave in 20-second bursts or over a double boiler, stirring frequently. This melted chocolate acts like glue to hold your tree layers together. I’ve learned that melting it too quickly can cause it to seize, so patience here pays off!
Step 2: Build the Bottom Layer
Put a small drop of the melted chocolate on the base of a mini Reese’s cup and place a regular-size Reese’s cup upside down on top. This forms the sturdy base of your tree. I find that holding them gently for a few seconds helps the chocolate set so the pieces don’t slide off when you add the next layer.
Step 3: Add Middle and Top Layers
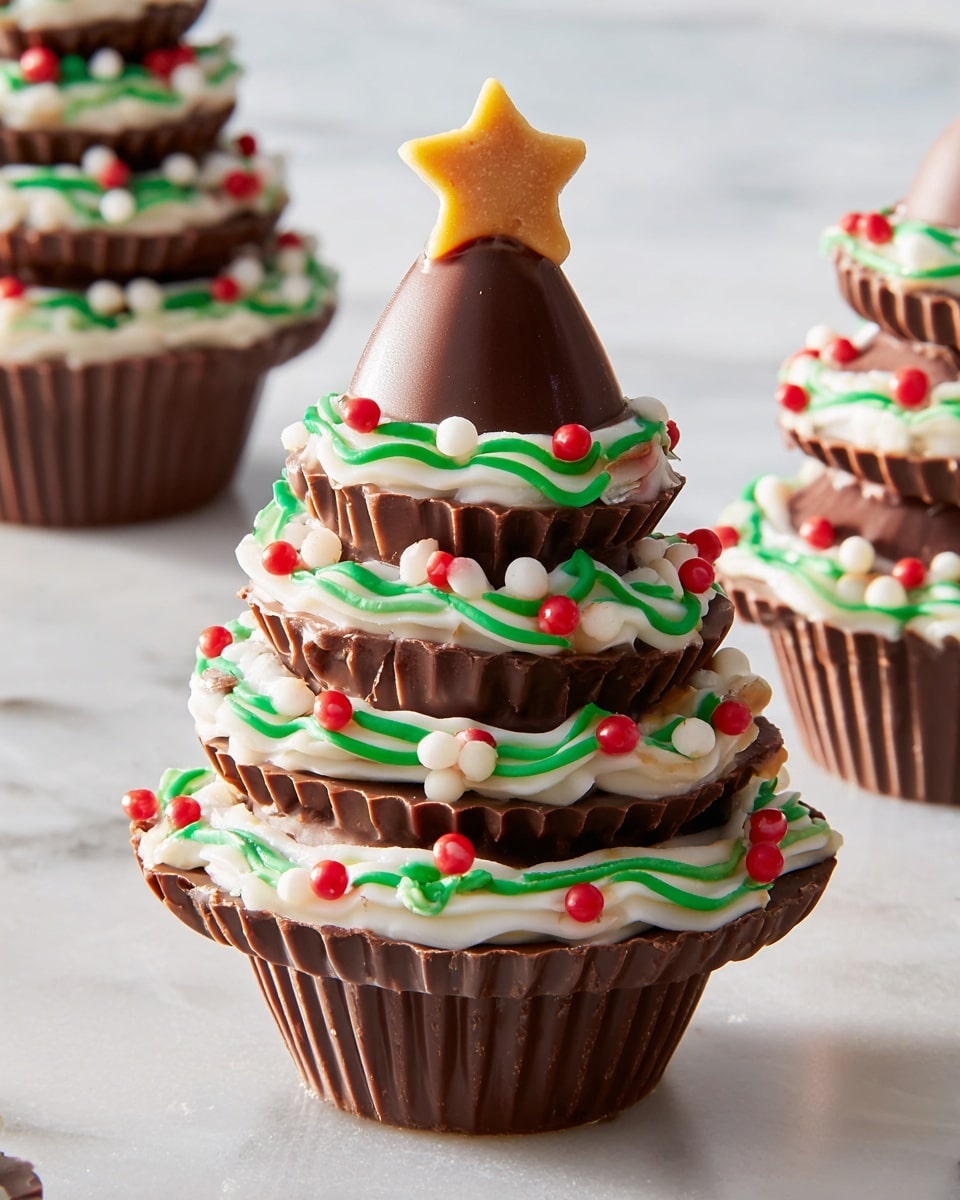
Next, top the regular Reese’s cup with a tiny drop of chocolate, then add a mini Reese’s cup upside down. Finish with a dab of chocolate for the Hershey’s kiss on top—the tree topper! Don’t rush this part; make sure each layer is secure before moving on, or you risk a candy collapse.
Step 4: Decorate Your Trees
Use your white and green icing to pipe garlands around the tree layers. I love faux garlands—they add so much charm! Then, shower the trees with sprinkles, and adhere a gold star to the top of each Hershey’s kiss with a tiny dab of frosting. For a snowy touch, dust everything lightly with confectioners’ sugar.
Pro Tips for Making Reese’s Trees Recipe
- Chocolate Melting: I learned it’s best to melt chocolate slowly and stir often to keep it smooth and shiny for gluing.
- Layer Stability: Hold each layer firmly for a few seconds so it sets well before stacking the next piece.
- Icing Consistency: Use slightly thick icing so it pipes nicely but holds shape for garlands and stars.
- Don’t Rush Cooling: Trying to decorate too fast leads to smudges—give your trees a few minutes between steps to set.
How to Serve Reese’s Trees Recipe

Garnishes
I like to keep garnishes simple but festive—extra sprinkles and a dusting of confectioners’ sugar transform these trees into truly magical treats. Sometimes, I throw on edible glitter for an added sparkle that really wows guests.
Side Dishes
These trees pair beautifully with a warm cup of hot chocolate or a glass of festive eggnog if you’re serving adults. I’ve also served them alongside classic sugar cookies for a fun holiday dessert spread that everyone enjoyed.
Creative Ways to Present
For holiday parties, I arrange the Reese’s Trees Recipe on festive platters surrounded by pine sprigs or holly for a woodland feel. One year, I set them in mini cupcake liners tinted green and red; it added a cute pop of color and kept them from sliding around on the tray.
Make Ahead and Storage
Storing Leftovers
Once your Reese’s Trees are cooled and decorated, store them in an airtight container at room temperature. From my experience, they keep well for 3-4 days without losing their charm, which is perfect when you want to prep ahead for holiday guests.
Freezing
I haven’t tried freezing these because the frosting and sprinkles can get a bit dusty after thawing, but if you want to freeze, wrap them carefully in plastic wrap and store in a freezer-safe container. Thaw slowly in the fridge to avoid moisture buildup.
Reheating
Since these are no-bake treats, reheating isn’t needed. But if stored in a cool place, they taste fresh and just as delightful. If your kitchen is warm, chilling them briefly before serving helps the chocolate firm up nicely.
FAQs
-
Can I use almond butter cups instead of Reese’s peanut butter cups?
Absolutely! Almond butter cups or any similar chocolate candy will work if you want a slight flavor change or need a nut allergy-friendly option. Just make sure the sizes are similar so your trees stack nicely.
-
How long does it take to assemble the Reese’s Trees Recipe?
The actual assembly takes about 10 minutes once your chocolate is melted—you’ll be surprised how quick and easy it is! Decorating can take a little longer if you want to get creative.
-
Can I make these trees ahead of time for a party?
Yes! You can make and decorate them a day or two in advance. Store in an airtight container at room temperature, and they’ll stay fresh and handsome for your event.
-
What’s the best way to melt chocolate for this recipe?
Use a microwave in short bursts of 15-20 seconds, stirring between each, or melt gently over a double boiler for smooth, glossy chocolate that sets well as glue.
Final Thoughts
Making the Reese’s Trees Recipe has become a favorite holiday ritual in my house—it’s such a joy to see the kids’ faces light up when they get to assemble and decorate these charming treats. I hope this recipe brings you the same joy and ease, whether you’re whipping them up for a party, a classroom snack, or just a fun family activity. Give it a try—you’ll love how festive and fun these little Reese’s trees turn out!
Print
Reese’s Trees Recipe
- Prep Time: 10 minutes
- Cook Time: 0 minutes
- Total Time: 10 minutes
- Yield: 24 trees
- Category: Dessert
- Method: No-Cook
- Cuisine: American
Description
Reese’s Trees are adorable and easy-to-make festive treats that stack mini Reese’s cups, regular Reese’s cups, and Hershey kisses to create cute chocolate Christmas trees. Decorated with colorful icing, sprinkles, and gold stars, these no-bake treats make perfect holiday snacks or party desserts with minimal effort and no cooking required.
Ingredients
Chocolate Base
- 1/2 cup chocolate chips, melted
Chocolate Components
- 24 mini Reese’s cups
- 12 regular Reese’s cups
- 12 Hershey kisses
Decorations
- White and green decorating icing
- Sprinkles
- Gold stars
- Confectioners’ sugar, for dusting (optional)
Instructions
- Assemble the base: Place a small amount of melted chocolate on the bottom of a mini Reese’s cup to act as glue and stabilize the structure.
- Add the middle layer: Arrange a regular-size Reese’s cup upside down on top of the mini Reese’s cup with melted chocolate to secure it.
- Build the top layer: Place another mini Reese’s cup upside down on top of the regular Reese’s cup, dabbing it with more melted chocolate to hold it in place.
- Top with a Hershey’s kiss: Add a dab of melted chocolate and position a Hershey kiss at the peak of the tree structure.
- Decorate trees: Pipe white and green icing around the assembled trees to mimic garlands, then sprinkle colorful sprinkles over to add festive flair.
- Add star toppers: Apply a small amount of frosting to the top of the Hershey kiss and carefully adhere a gold star for the finishing touch.
- Optional snowy effect: Lightly dust the completed trees with confectioners’ sugar to create a snow-like appearance.
Notes
- These Reese’s Trees are one of the simplest Christmas desserts you can make, delivering a charming and festive look with minimal effort.
- No baking or cooking is required, making this a perfect last-minute holiday treat.
- Feel free to customize decorations with different sprinkles and icing colors according to your holiday theme.
- Handle the trees gently as they are constructed with melted chocolate which needs to set to stabilize the stacks.
Nutrition
- Serving Size: 1 tree
- Calories: 110
- Sugar: 14g
- Sodium: 55mg
- Fat: 6g
- Saturated Fat: 3.5g
- Unsaturated Fat: 2g
- Trans Fat: 0g
- Carbohydrates: 13g
- Fiber: 1g
- Protein: 2g
- Cholesterol: 5mg


